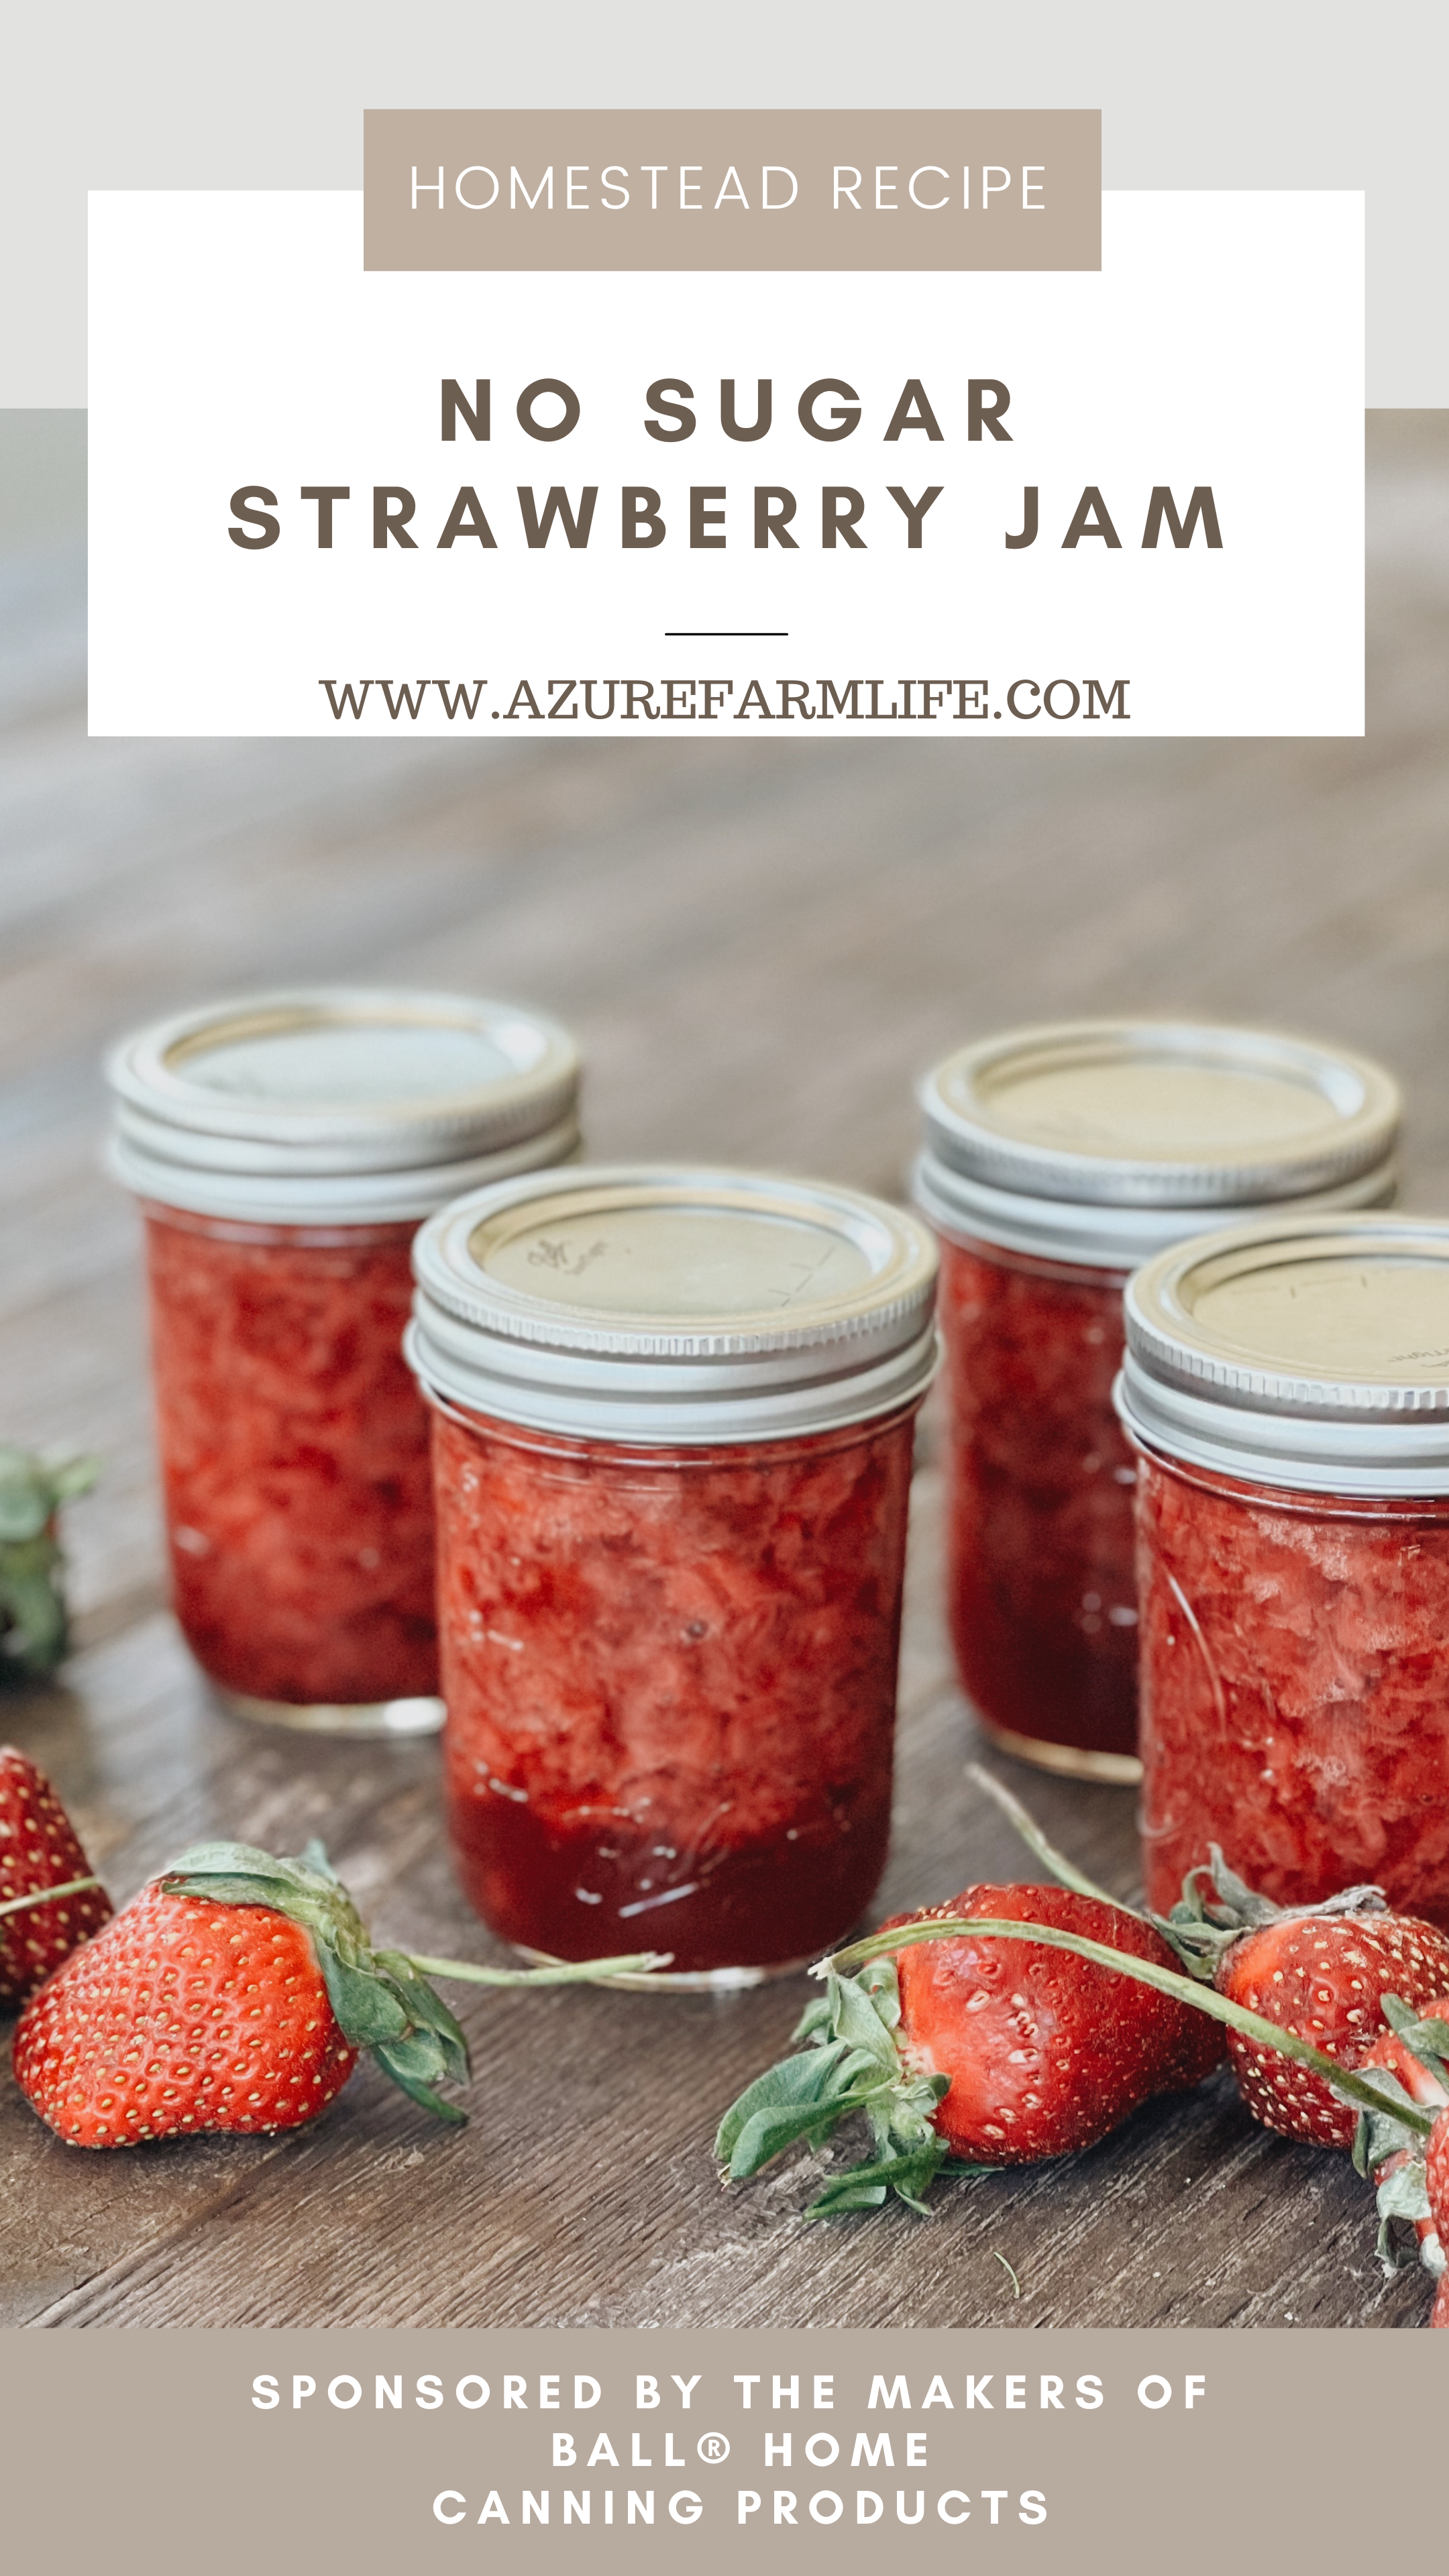
A Sweet, Juicy, Sugar-Free Strawberry Jam Canning Recipe
What is it about strawberries that make us feel loved, joyful and just goood?
I believe it is many things: their beautiful, striking pink/ red colors, the sweet juiciness when you bite into them, the balance of sweet and tartness, their nutritional content, and the fact that they are so versatile!
I love canning strawberry jam - knowing that it is homemade and healthier than store-bought preserves. They don't contain any added sugars, preservatives, or colorants.
My favorite way of making sugar-free strawberry jam is with water-bath-canning. It is quick, easy, and delicious! This is the perfect strawberry jam canning recipe if you are a first-time canner!
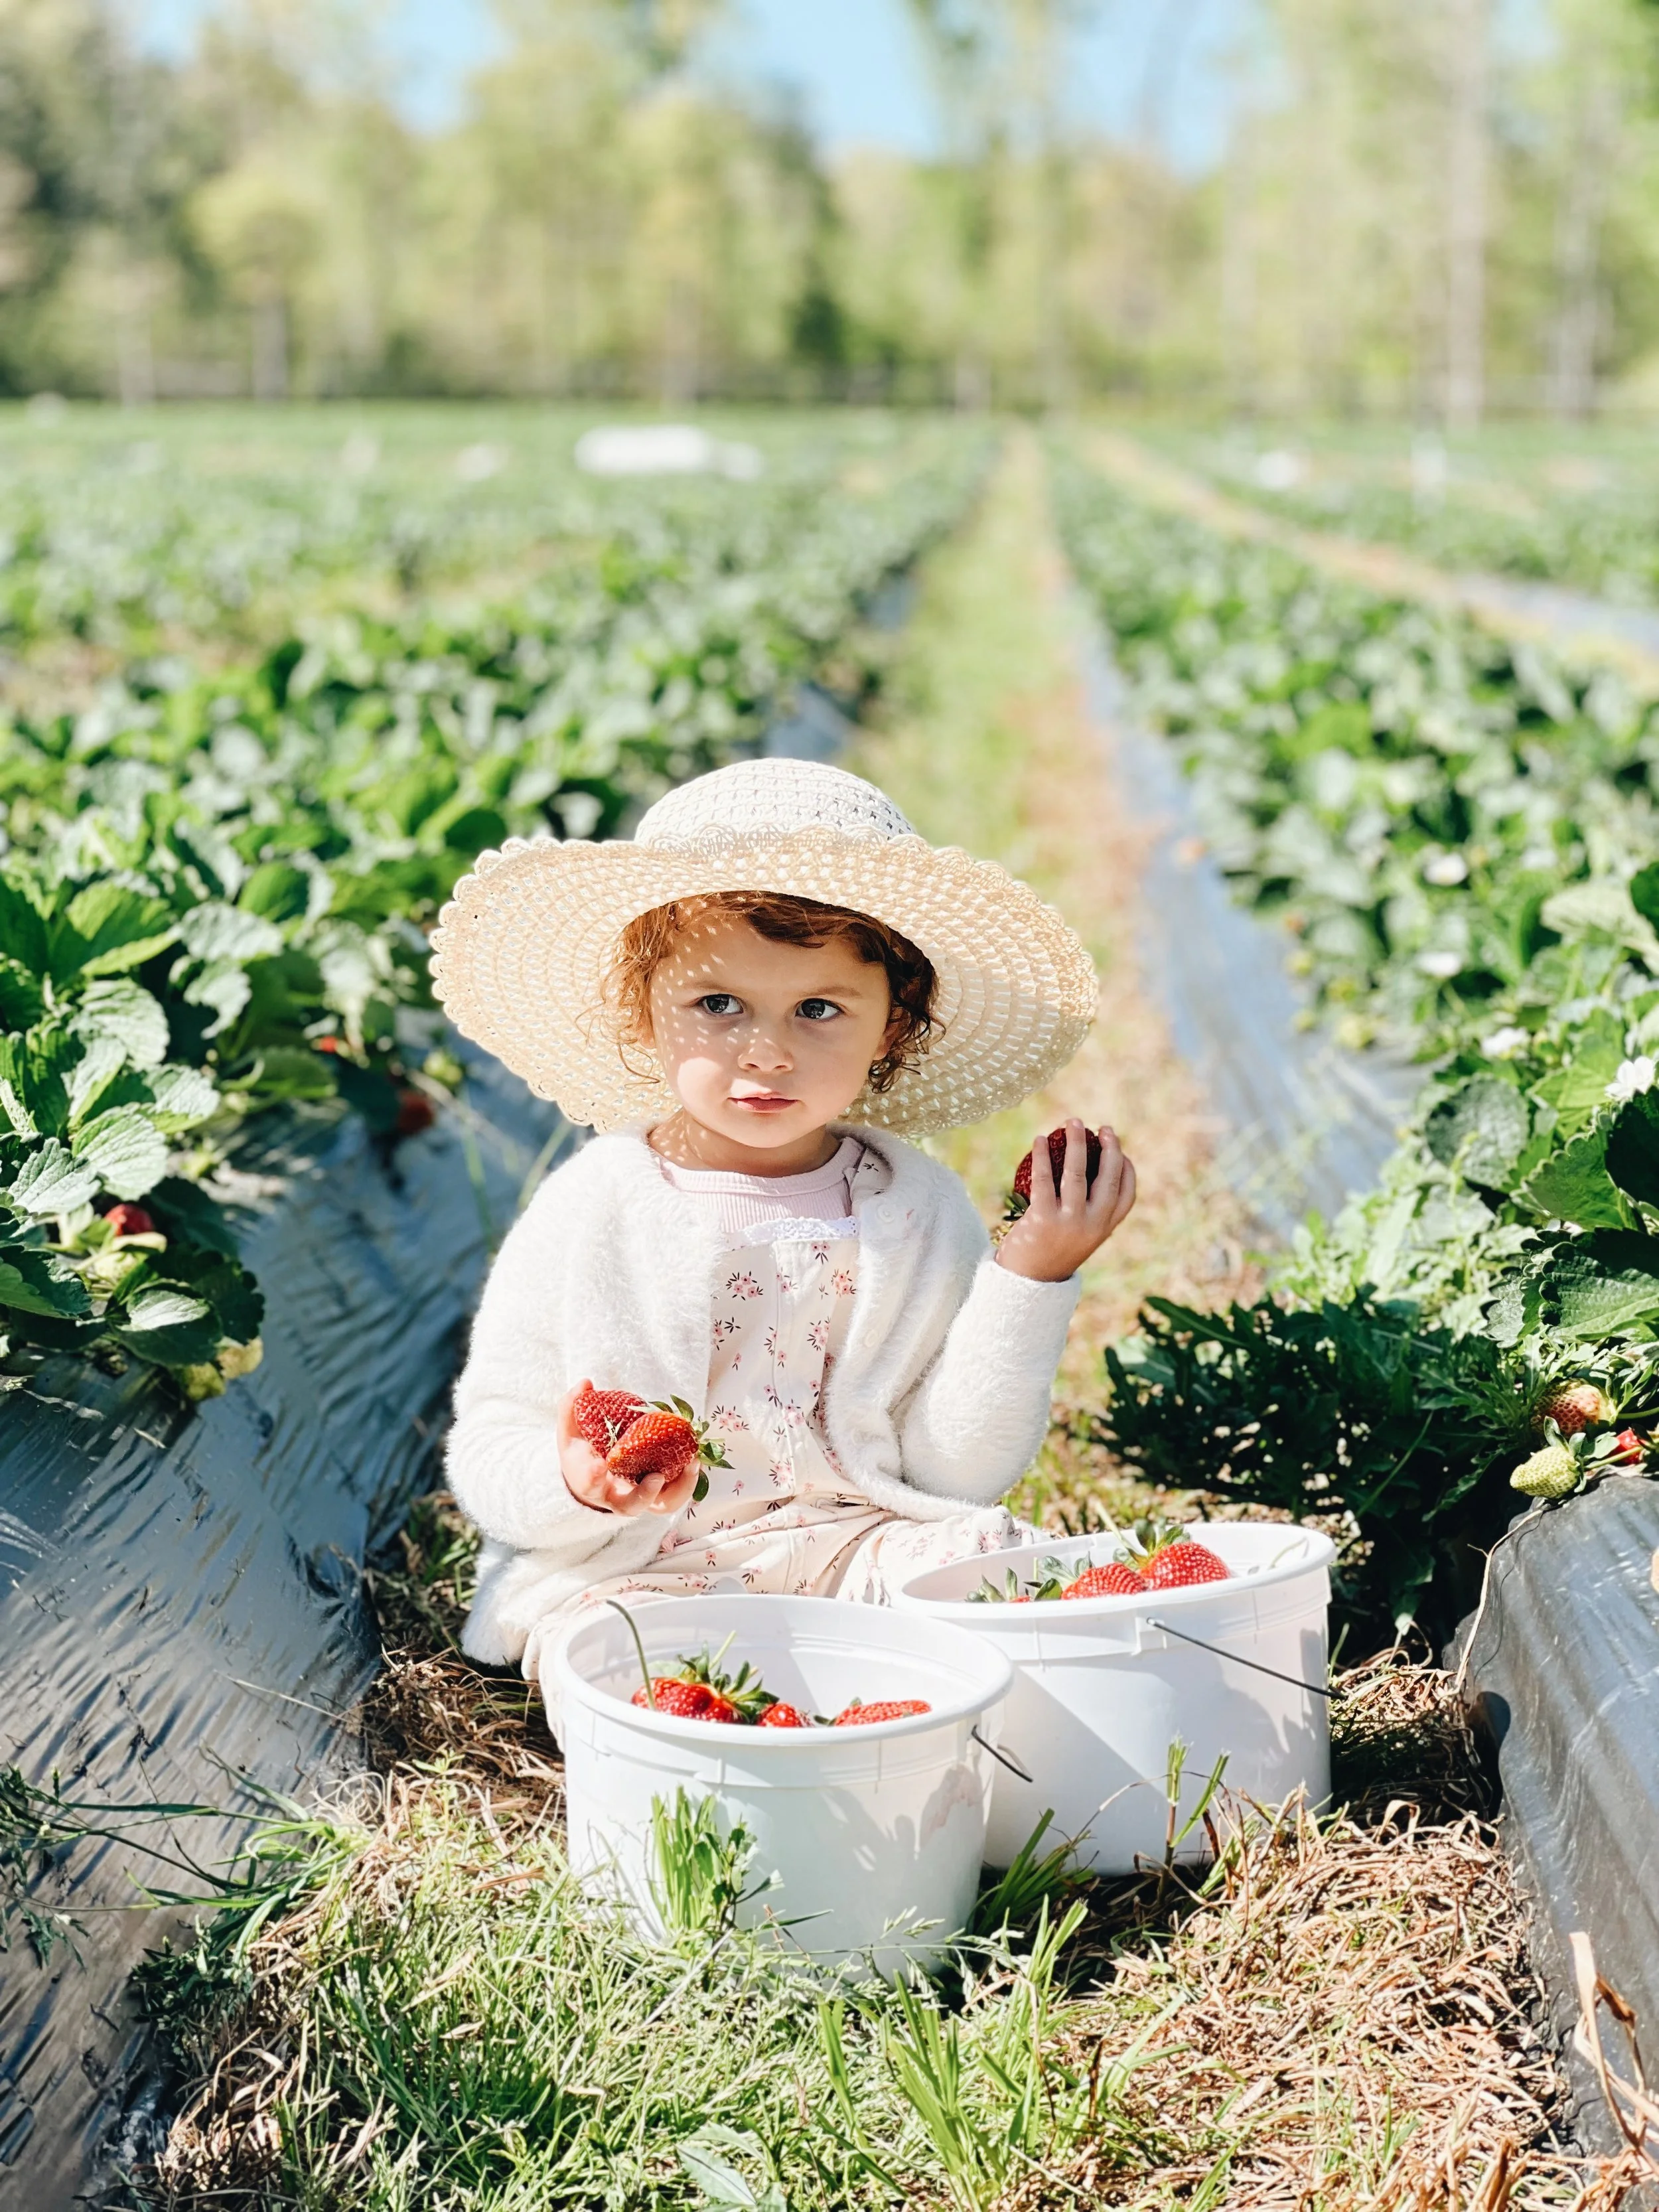
Scroll down to see how easy canning can be, the recipe for this delicious sugar-free strawberry jam, and some info on growing strawberries! Ava and I had the best time at the strawberry patch picking the strawberries to make the jam!
This post is sponsored by the makers of Ball® home canning products.*

Sugar-Free Strawberry Jam canning Recipe
Canning strawberry jam is a great way to enjoy this beautiful, tasty fruit right throughout the year!
The recipe below is an absolute favorite of mine! I love that it has no added sugar! Perfect, delicious, and easy for first-time canners.
Below is a quick summary of the strawberry jam canning recipe, and if you scroll down, you will get a more in-depth step-by-step canning guide!
This recipe makes about 4 (8 oz) half-pints
You will need:
4 cups crushed strawberries ( Even a little more like 4.5 cups is good to ensure you have enough)
2/3 cup unsweetened fruit juice ( I used grape juice for this recipe)
3 Tbsp Ball® RealFruit™ Low or No-Sugar Needed Pectin
4 Ball® Half Pint Jars
Directions:
Prepare boiling water canner. Heat jars in simmering water until ready for use. Do not boil. Wash lids in warm soapy water and set bands aside.
Combine strawberries and juice in a medium saucepan. Gradually stir in pectin. Bring mixture to a full rolling boil that cannot be stirred down. Boil hard for 1 minute, stirring constantly. Remove from heat. Skim foam if necessary.
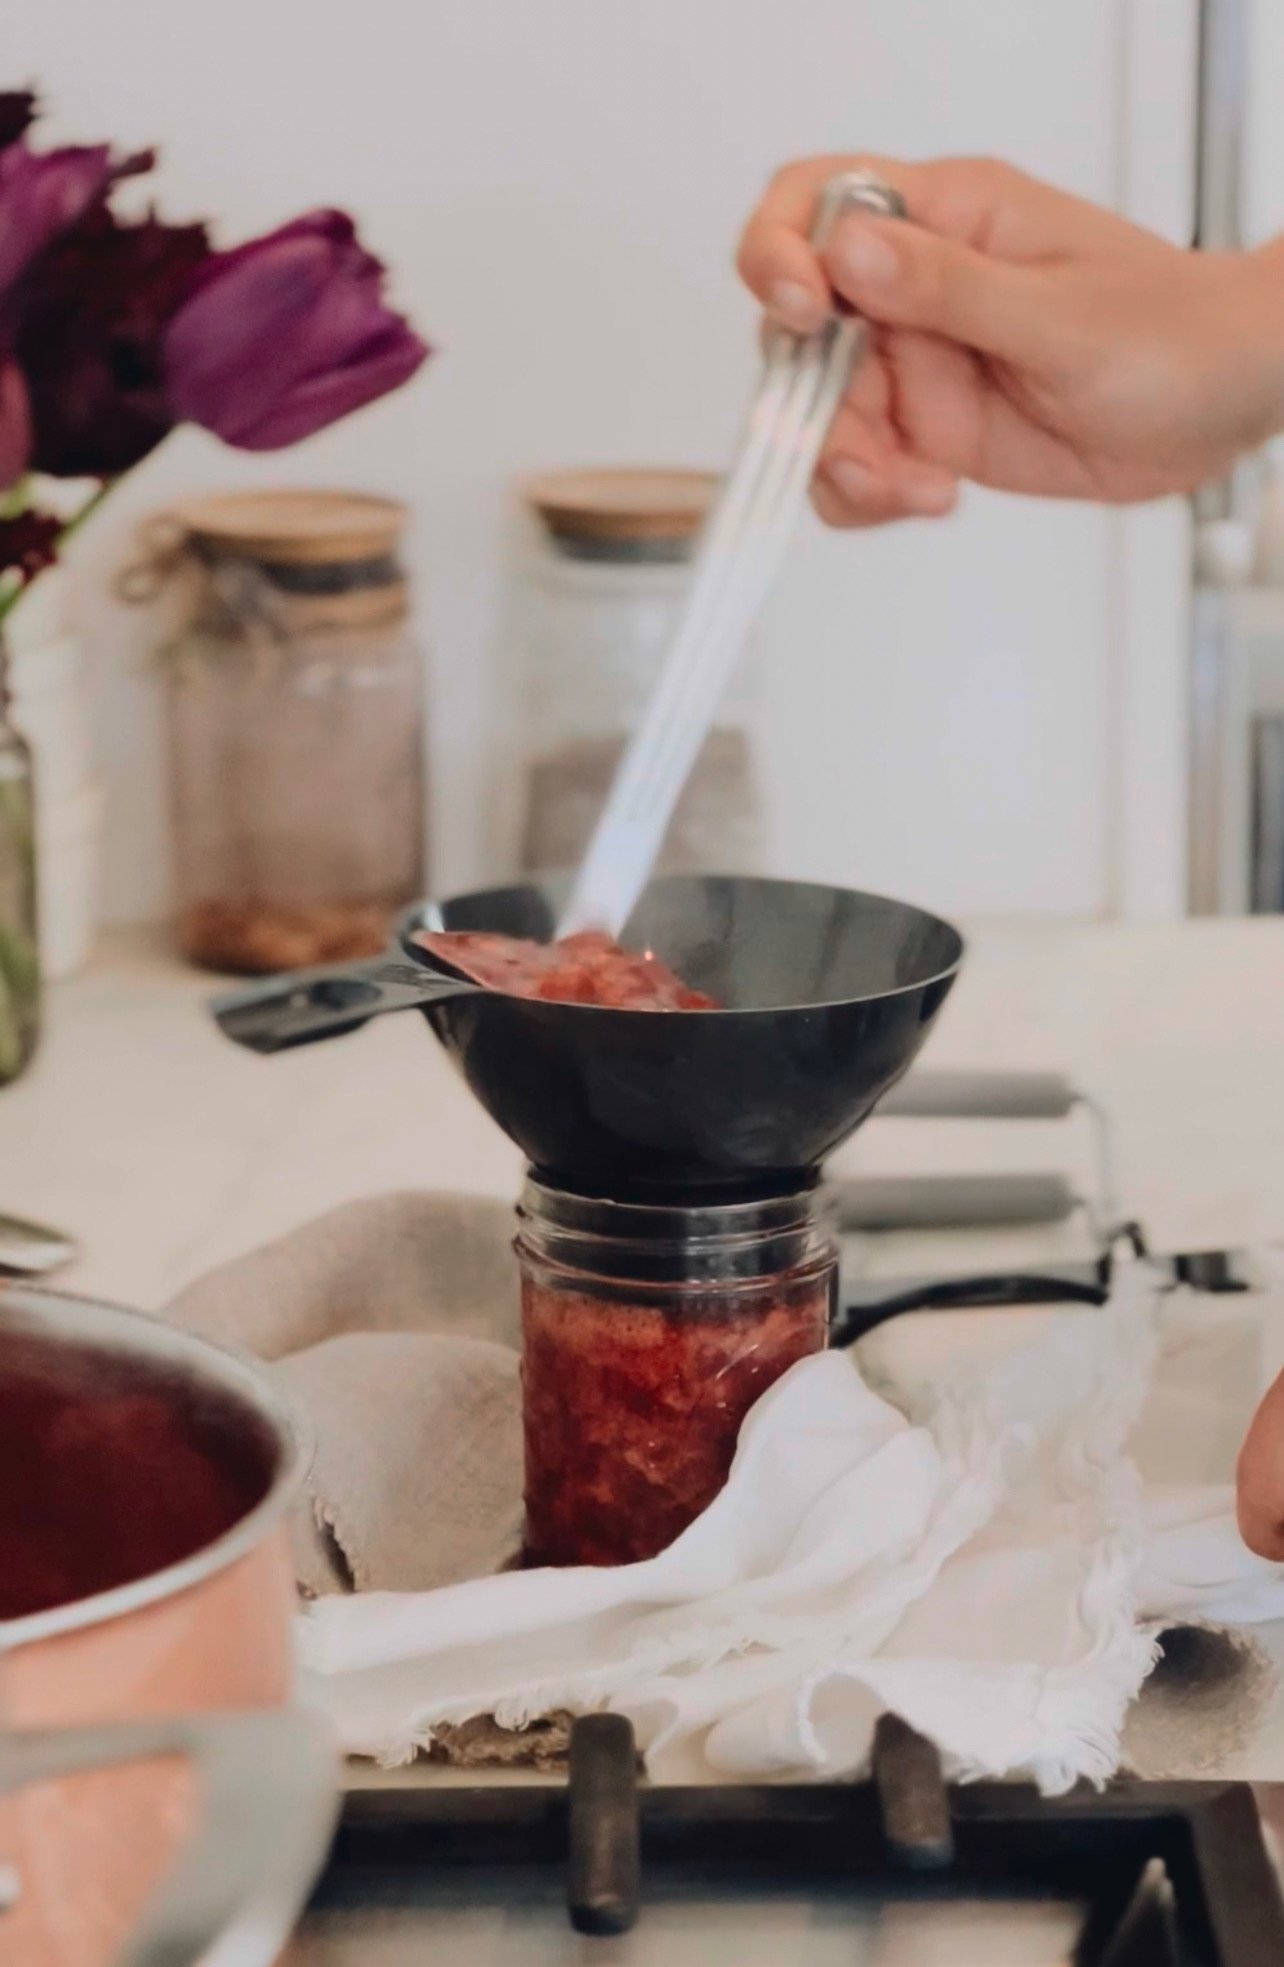
Ladle hot jam into a hot jar leaving a ¼ inch of headspace. Remove air bubbles. Wipe jar rim.
Center the lid on the jar and apply the band, adjusting to fingertip tight. Place jar in boiling water canner. Repeat until all jars are filled.
Process jars for 10 minutes, adjusting for altitude. Turn off the heat, remove the lid, and let the jars stand for 5 minutes. Remove jars and cool for 12-24 hours.
Check lids for seal, they should not flex when the center is pressed.
When canned and stored properly, this strawberry jam will stay fresh for a very long time.
Enjoy on whatever your heart desires!

canning strawberry jam Steps
Canning food products may seem like a difficult task left for the experts, but it's easier than it sounds!
Anyone can make delicious pickled foods, jams (like the strawberry jam recipe below), and so much more in the comfort of their home. You only need some basic tools and follow a few simple steps.
HERE is an easy step-by-step printable you can download to quickly refer to when needed.
did you know I have a full canning course?

canning course
Whether you are a total newbie or would like to improve your canning skills, this canning course is IT! Become an expert canner, making delicious canning recipes for many years to come.
You will learn everything you need to know to effectively and safely can at home, overcoming any fears or doubts you may have.
- 25 informative, interactive videos
- The dos and don'ts of canning.
- Your most common canning questions and fears addressed.
- The best practices for perfect canning.
- Five delicious beginner recipes.
You will need:
Water bath pot or a deep stock/ pasta pot. It should be deep enough to have 2 - 3 inches of space above the jars to leave room for the boiling water.
Padding at the bottom to minimize rattling and possible shatter of your jars and allow for even heat circulation. A wire rack or trivet will do the trick.
Ball® Glass jars, lids, bands, and your contents ready to go into them.
A jar lifter
Home canning funnel, bubble remover, and headspace tool.
This is the best starter canning kit. It has absolutely everything you need and is perfect for this recipe! All the items above, except for a pot, can be found in this kit. Ball® Home Canning products are my absolute favorite when it comes to canning. It is the only brand of jars and canning equipment I use and trust.
See the steps for canning broken down below.


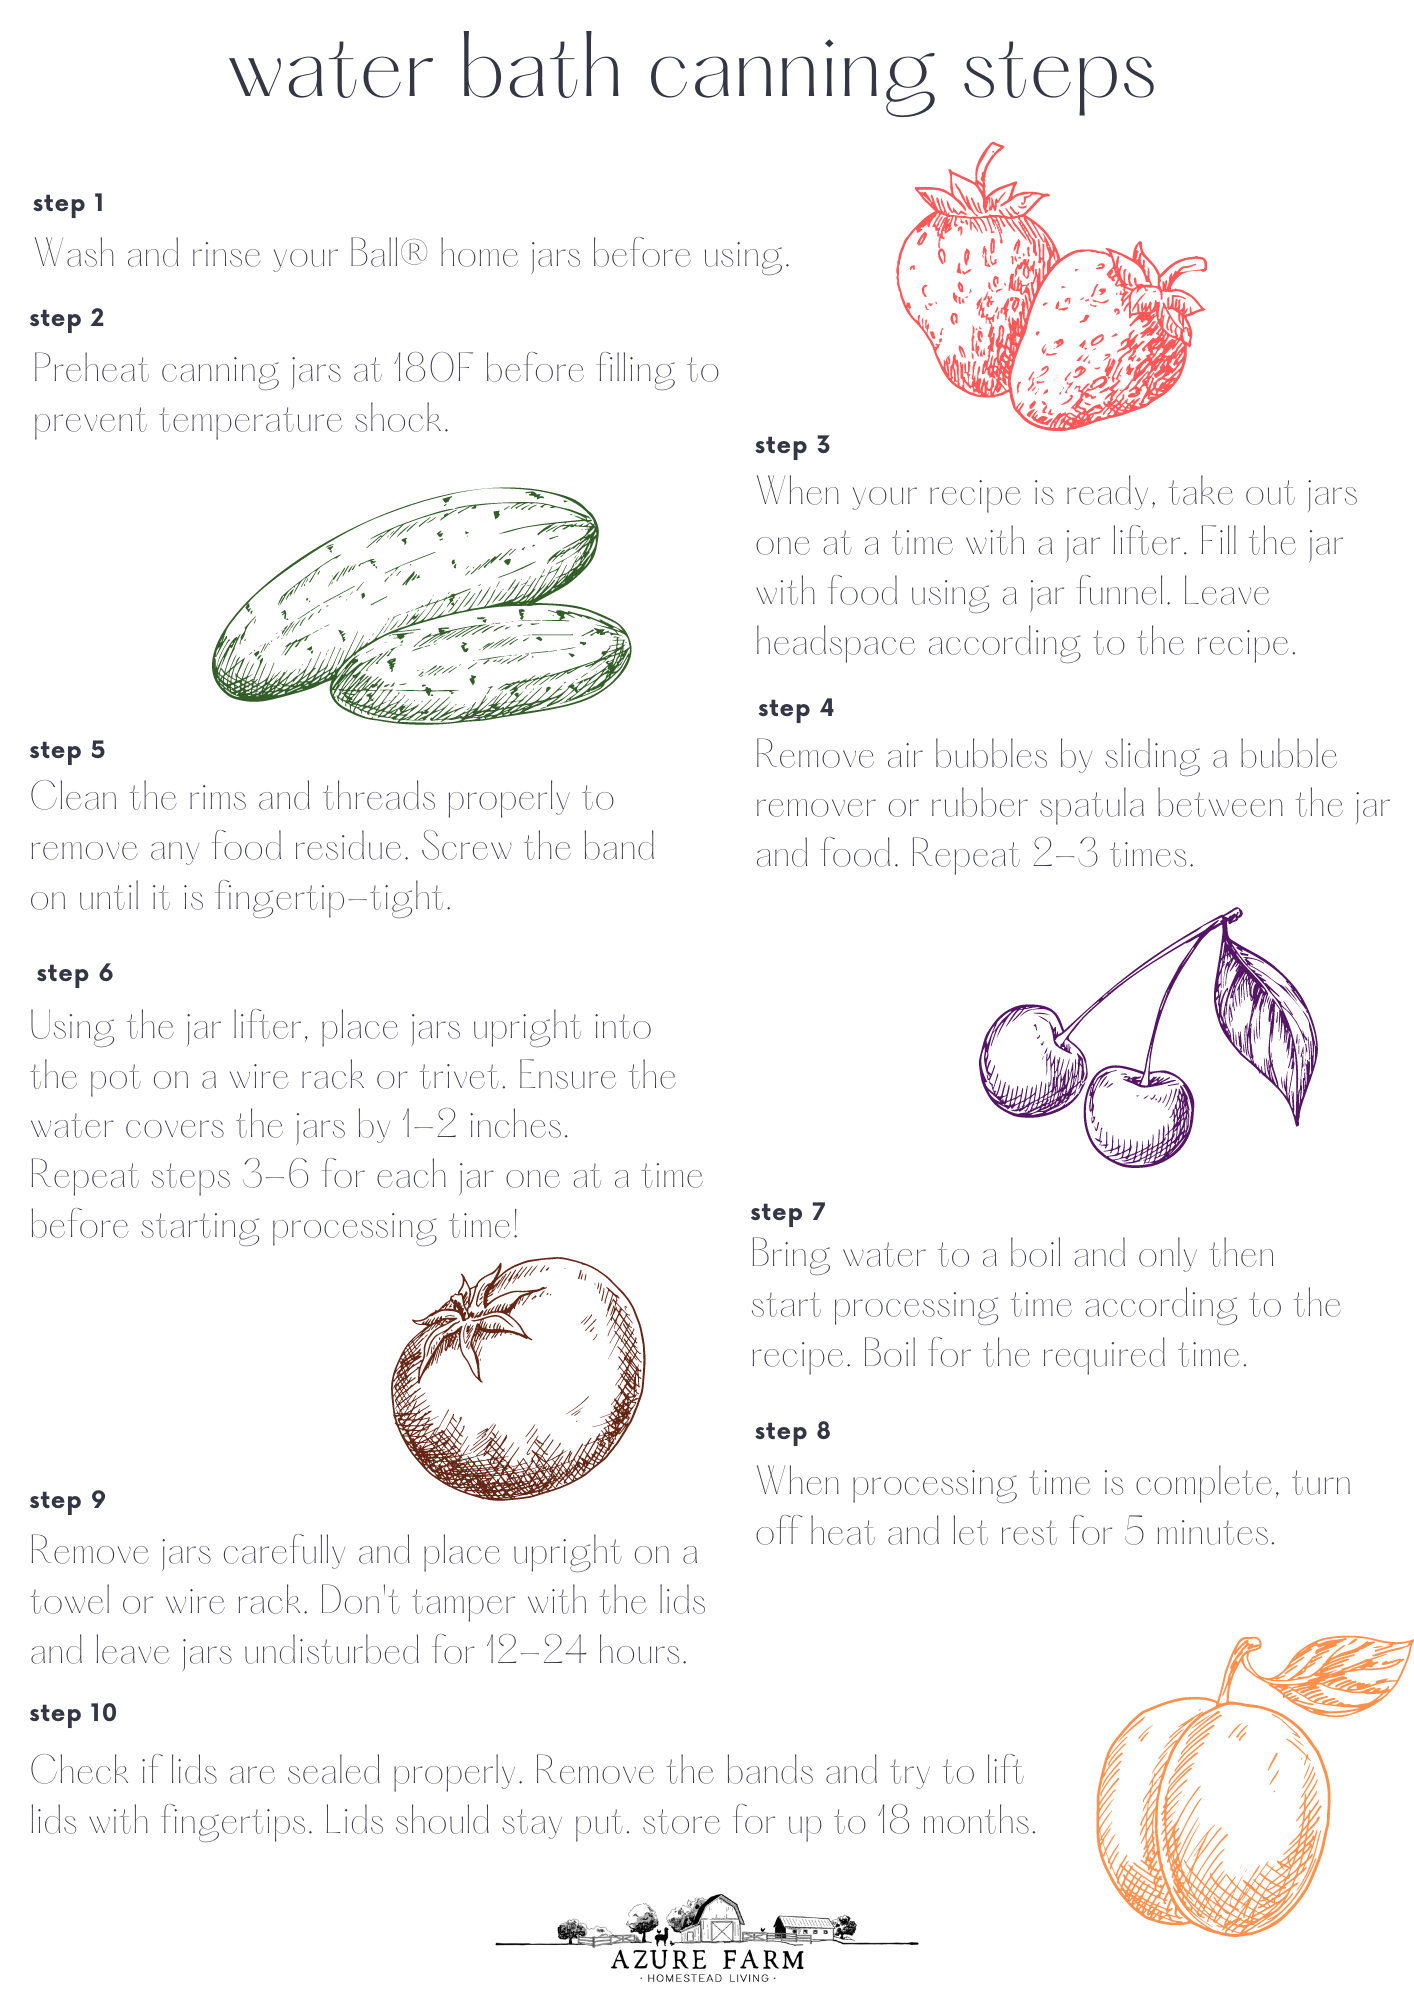
Step 1
Wash and rinse all your Ball® jars to ensure they’re free from dust and any particles.
Step 2
The Ball® jars should be pre-heated before filling and processing. This will prevent your jars from cracking due to sudden thermal shock. A temperature of 180 degrees F should be sufficient to accomplish this. Just let them simmer in the pot ( DO NOT BOIL) before filling them.
Step 3
Prepare your recipe and put the food into the jars. Remember to leave the recommended headspace according to the approved recipe between the lip of the container and the surface of the food or brine. This will ensure there's room for any possible expansion during boiling.

This specific recipe calls for 1/4 inch headspace
Step 4
Remove any air bubbles with the bubble remover or a rubber spatula by scraping between the jar and the food to release trapped air. Repeat this two to three times.

Step 5
Wipe the rim and threads of the jar using a damp cloth to remove any food residue. Place the lid and screw the band on until it is fingertip-tight.
Step 6
Place the jars upright into the water and onto the padding using your jar lifter. Your jars should be covered by 1-2 inches of water; if not covered, add more water.
Repeat steps 3-6 for each jar one at a time before jumping into the processing time! When boiling has started, close the pot's lid, and don't open it again.

Step 7
The processing time of a recipe only starts when the water has reached boiling point. Start your timer and boil for the required time according to the recipe.
Step 8
When the processing time is completed, turn off your burner, open the pot's lid, and wait 5 minutes before taking your jars out. This helps for a better vacuum seal.
Step 9
Carefully remove the jars with the jar remover. Keep them upright and place your jars on a towel or a wire rack to prevent cracking due to temperature differences. Let your jars sit undisturbed for 12 to 24 hours to cool down. Don't tamper with the lid or try to tighten the band, as this may interfere with the sealing process.
Step 10
Inspect your lids; they should not flex up and down when the center is pressed. Wipe down your jars and lids and store them in a cool, dry, and dark place for up to 18 months.
For more info on water-bath canning and the do’s and don’ts, you may find this blog very helpful:


Growing Strawberries
Growing strawberries is pretty easy, as they can grow in all temperate regions. They grow easily in many spaces, including small pots, hanging baskets, raised beds, and large plots.
Strawberries are perennials, which means if you take good care of the plants, they will produce fruit for several years with minimal effort.
There are a variety of strawberry plants to choose from, and they are divided into 3 categories:
June bearing - As the name suggests, you will get one big harvest of strawberries around June, depending on your growing zone.
Everbearing - These plants have smaller crops, but they will continuously produce strawberries until the end of summer, as long as there are 12 hours of sunlight.
Day-neutral - The crops have three main fruit-bearing peaks, mainly early June, mid-July, and late August.
Your local garden center will be able to advise which types and categories of strawberries will grow best in your gardening zone and climate.
In most zones, a favorite among home gardeners is Surecrop, which reliably produces firm fruits in almost any region and soil type.
Strawberries can tolerate cold and some light frost, but it's best to plant them in early Spring. If you haven't done so yet, that's ok; just do it soon ;-)
I recommend planting around 25 plants for a family to make the harvest worthwhile and ensuring you have plenty of strawberries for snacking, salads, and yummy summer drinks!
For my complete guide to growing strawberries, including info on where to plant them, their soil requirements, how to plant them, their maintenance needs, and harvesting time, have a look at this blog post:
HOW TO GROW DELICIOUS STRAWBERRIES; ALL YOU NEED TO KNOW TO GET STARTED


I hope you love this strawberry jam canning recipe as much as I do! Actually, I know you will!
See below a few other of my favorite strawberry canning recipes:
Low Sugar Strawberry Freezer Jam
Love, Annette xx
canning course
Still unsure about this whole canning thing and process?
Do you still have canning fears and questions?
Want to learn all there is on how to can food and become a canning expert?
Then you might want to get my CANNING COURSE in partnership with Ball® home canning!
Whether you are a total newbie (we have all been there!) or would like to improve your canning skills, this canning course is IT!
After this course, canning will feel like a breeze, and you will be an expert canner, making delicious canning recipes for many years to come.
You will learn everything you need to know about how to can food effectively and safely at home, overcoming any fears or doubts you may have.
THE COURSE INCLUDES:
*A total of 25 informative, interactive videos taking you from start to finish,
covering everything there is to know about canning.
*The do's and don'ts of canning.
*Your most common canning questions answered and fears addressed.
*The best practices and tips for perfect canning.
*Five of my favorite delicious canning recipes that are great for beginners.
*An e-book with over 30 pages of information and recipes to guide you through the course.
The course is included in our HOMEGROWN membership platform.
By signing up, you'll have access to the canning course plus our gardening course,
how to raise chickens course, and many more!
For a small fee of $5.99/month or $49 for the year, you have years of experience, trial and error, and knowledge right at your fingertips.
pin for later
*Disclosure: This is a sponsored post that is part of an ongoing partnership with the Fresh Preserving Division of Newell Brands. They have provided jars, equipment and monetary compensation. All thoughts and opinions expressed are my own.