Direct Sowing in 10 Steps Plus A Chart On Starting Seeds Outdoors
Even though I love gardening and tend to it daily, I realize it is not the same for everyone. Perhaps you don't have the time, energy, on patience to start with seedlings indoors to transplant them later.
You want gardening to be simple and easy and kind of just take care of itself ;-)
This is where direct sowing can be your friend and make gardening easier.
If you don't want to first start seedlings indoors, no worries! There are quite a few vegetables that you can direct sow when your soil is warming up and workable.

What Is Direct Sowing?
Direct sowing involves planting seeds directly into your outdoor garden soil.
Direct sowing is easiest in mild climates, where late winter and early spring provide above-freezing temperatures and reliable precipitation.
If you live in a less forgiving climate, you can still sow both small seeds and larger seeds directly into the ground, but you must carefully time your planting to make the most out of the growing season.
I am in Zone 7b, which has a moderate climate, making it easier to direct sow and prolonging our growing season.
Most of the seed packets will indicate when to sow the seeds, but usually, it would be 8- 10 weeks before the last frost in your region.
Direct Sowing vs. Starting Seedlings
When you direct sow, you would plant your seeds outdoors directly into the ground. Whereas with starting seedlings, you will plant the seeds indoors in seed trays or pots.
Indoors you can control the growing conditions such as temperature, light, and soil. There is also no risk of frost, meaning you can start planting earlier and prolong your growing season.
After a few weeks, sometimes even days, your seedlings will sprout, and when they have several sets of leaves, you can transplant them outside in garden beds or containers.
Root crops (carrots, beets, turnips, etc.) should not be transplanted as the process will damage the root. Corn, squash, cucumbers, melons and beans/peas can be transplanted with care but it is still better to direct sow them.
Plants that were directly sowed often have sturdier root systems, but that does not mean seedlings will not have sound root systems. I mostly manage to keep my transplants alive :-)
When direct sowing, you also don't have to worry about transplant shock or hardening of your plants.
How to Direct Sow Seeds
There are a few steps to follow for optimal results and ensuring your seeds sprout in the natural garden and conditions.
1. Enhance the soil's nutrient content
Prepare your garden beds by adding topsoil or homemade compost to the top 6" layers of the soil. You can find good seed-starting or potting soil mixes at your local nursery.
2. Remove Weeds and Debris
To get off to a great start, remove all weeds before planting. When your seeds need to compete with weeds for energy and food, they will struggle to get growing. Remove any large rocks and sticks and break up clay clumps.
3. When to Sow
The time of the year to sow will be determined by which vegetables you plant and your gardening zone. This is the most crucial factor to ensure successful growth and harvests.
Soil temperature is also vital, and the optimal temperatures for most seeds are between 60-70 F degrees. But certain vegetables can tolerate cooler soil temperatures of 45-55 F. These include carrots, cabbage, cauliflower, radish, peas, and spinach.
Beets, carrots, and radishes will be sown in early spring.
Summer crops such as pumpkin, squash, cucumber, beans, and watermelons will be sown in late spring to early summer when all risk of frost has passed.
Winter crops such as Brussels sprouts, kale, and winter cabbage are sown around early to mid-summer. They need a long growing period to be harvested throughout winter.
Heat-loving crops such as tomatoes, peppers, or eggplant should preferably be started as seedlings indoors and transplanted in late spring. But you can direct sow them as well.
The seed packets will usually indicate when is the best time to sow.
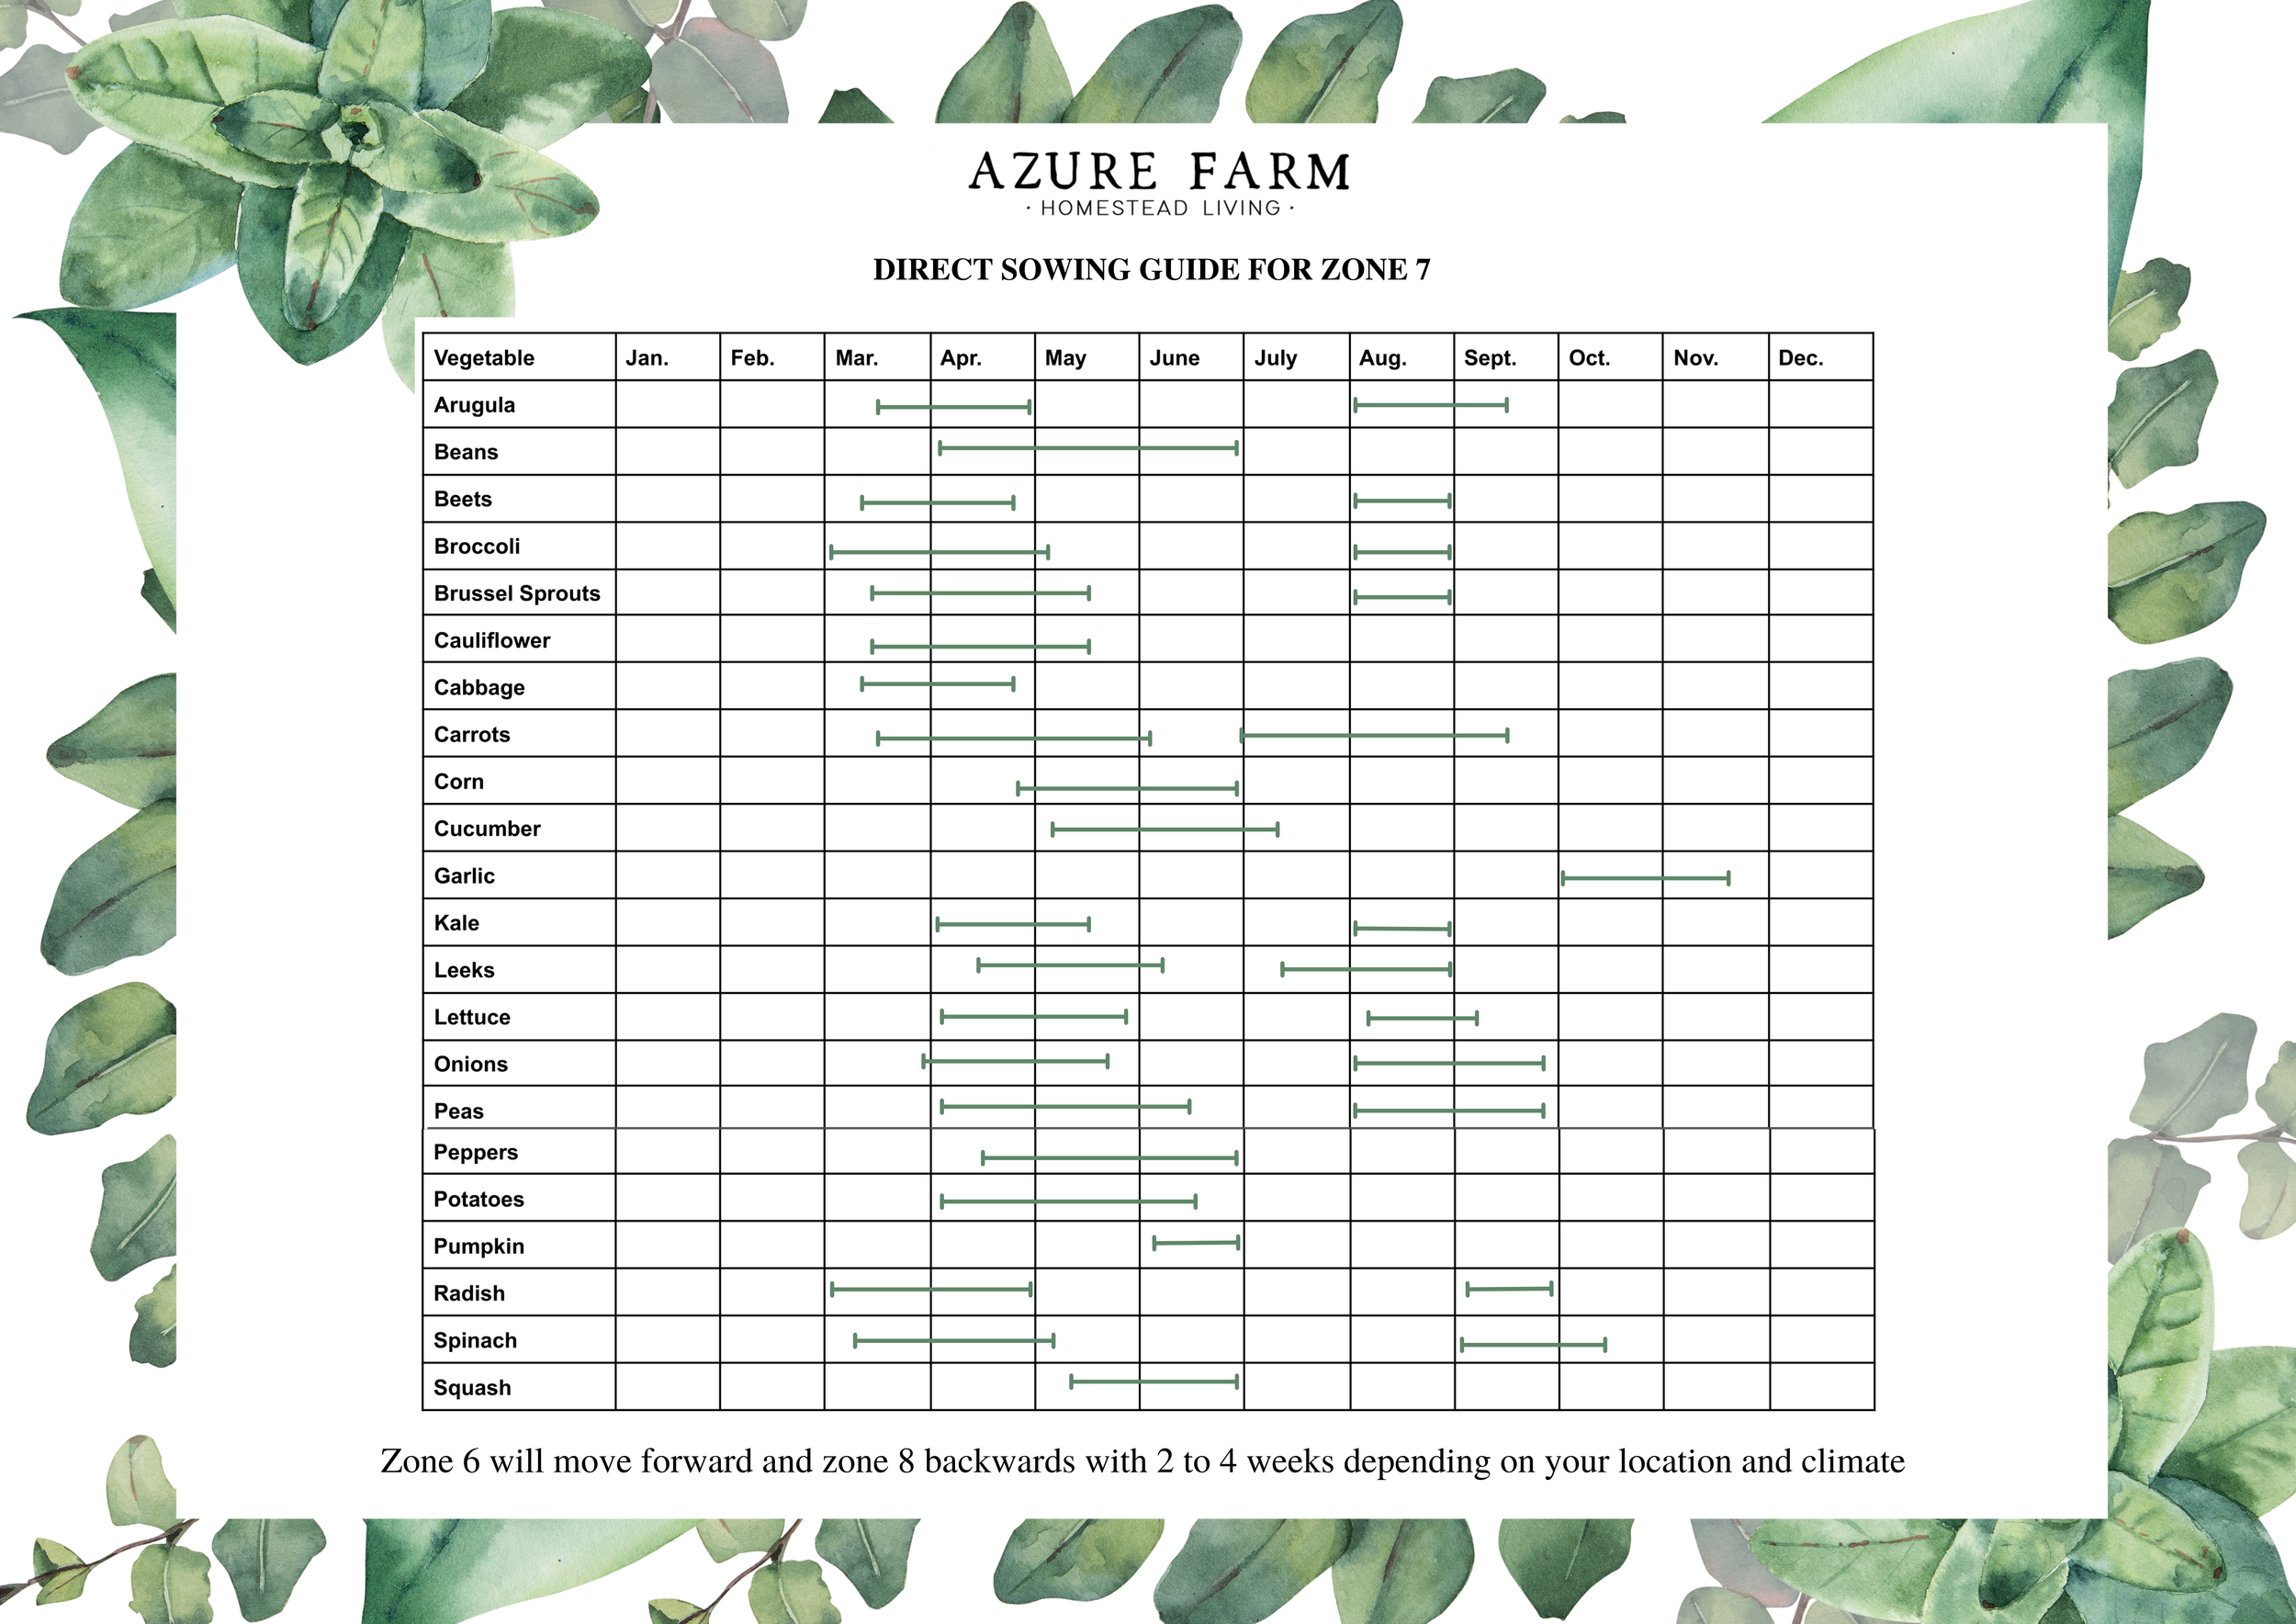
Down below you can find my suggested direct sowing guide for Zone 7. Zones 6 & 8 will differ by a few weeks. Please keep in mind that this is just a guide and what usually works for us.
4. Prepare Your Seeds if Needed
Certain seeds need some preparation before planting to help them germinate and sprout more quickly.
Some seeds need to be softened by soaking them in water, or scarified by rubbing them against fine sandpaper to help thin the hard shells. Look at the seed packet instructions or propagation books to learn more about seed preparations.
5. How to Sow
Vegetables with bigger seeds like peas and beans should be planted at a depth roughly three times the diameter of the seed itself. Smaller seeds like carrots can simply be pressed into the soil, just deep enough for the ground to cover them.
6. Companion Plant Seeds
We do a lot of companion planting in our garden. It helps deter pests, enrich the soil, attract beneficial insects, and benefit each other's growth. Examples include:
The Three Sisters trio - Corn, beans, and winter squash are planted together. The corn supports climbing beans, and the squash shades the ground to prevent moisture loss and discourage weeds and pests. And the beans put nitrogen back into the soil.
I would also often plant carrots and beets together, where the carrots have a more profound and the beets have a more shallow root system. This way, they don't compete for nutrients in the soil and have their own space to thrive.
For more companion planting combos, this post on my Instagram account will help you a lot!
And here’s how we control pests naturally in the garden with herbs, flowers, and veggies.

7. Water regularly
Seeds that are newly planted should be kept moist to help the germination process. You may need to water them twice a day in very hot weather.
Be careful how you water your seeds, as a strong force of water could ruin your seed planting efforts and wash the seeds out of your beds. Instead, use a rose fitting on a water can or the shower setting on your hose.
8. Place seed name tags
When you're going crazy and a little overboard with seed sowing (I'm guilty!), you may lose track of where you planted what and when. I like to mark my seeds with garden name tags or craft sticks to avoid overcrowding my seeds, accidentally pulling up "weeds," and keeping track of the growing process.
9. Time for thinning
To ensure your seedlings thrive into healthy plants, they need proper space to grow. When seedlings first start to sprout, they will have "seed leaves," which you should leave. Only when their true leaves appear should you thin them to allow proper spacing between the plants.
Thin them periodically as they grow until you are satisfied with their space and they don't crowd each other anymore.
10. Mulch and Fertilizer
After a few weeks, when your plants' stems are sturdier, you should add mulch to the soil. This will prevent water evaporation and help to keep away pests and critters.
When your plants start to shoot flower buds, you can feed them with organic fertilizer or manure for extra nutrients.

Whether you choose to direct sow or start seedlings indoors comes down to personal choice, your zone and climate, and the types of veggies you sow.
With time and gardening experience you will start to learn what works for your garden or not. In the end, it is a trial and error game. It took us a few years to learn what works best for us and how to plan our garden beds.
I hope this has helped you!
Love, Annette xx