A Step-By-Step Guide To Can DELICIOUS Mixed Berry Agave Jam
Oh, I just love a good homemade jam! Jams pair perfectly with a fresh scone, muffin, bagel, or crunchy toast. Especially when you crave something sweet!
As a young girl, I was always amazed when I saw my aunt Marty make delicious jams (among others!) from scratch. I mean, that, for me, was what homesteading success looked like. If you can make your own jam, you have made it!
Today I know making jam and canning food are not the measurements for homesteading success. It is actually such a wonderful skill that anyone can easily master!
And don't let the word "canning" deter you from trying to make your own jam. I will show you how easy it is to can your own jam in only 9 steps! With some common questions and concerns, you may have along the way.
Scroll down to get the recipe!
*This post is sponsored by the makers of Ball® home canning products
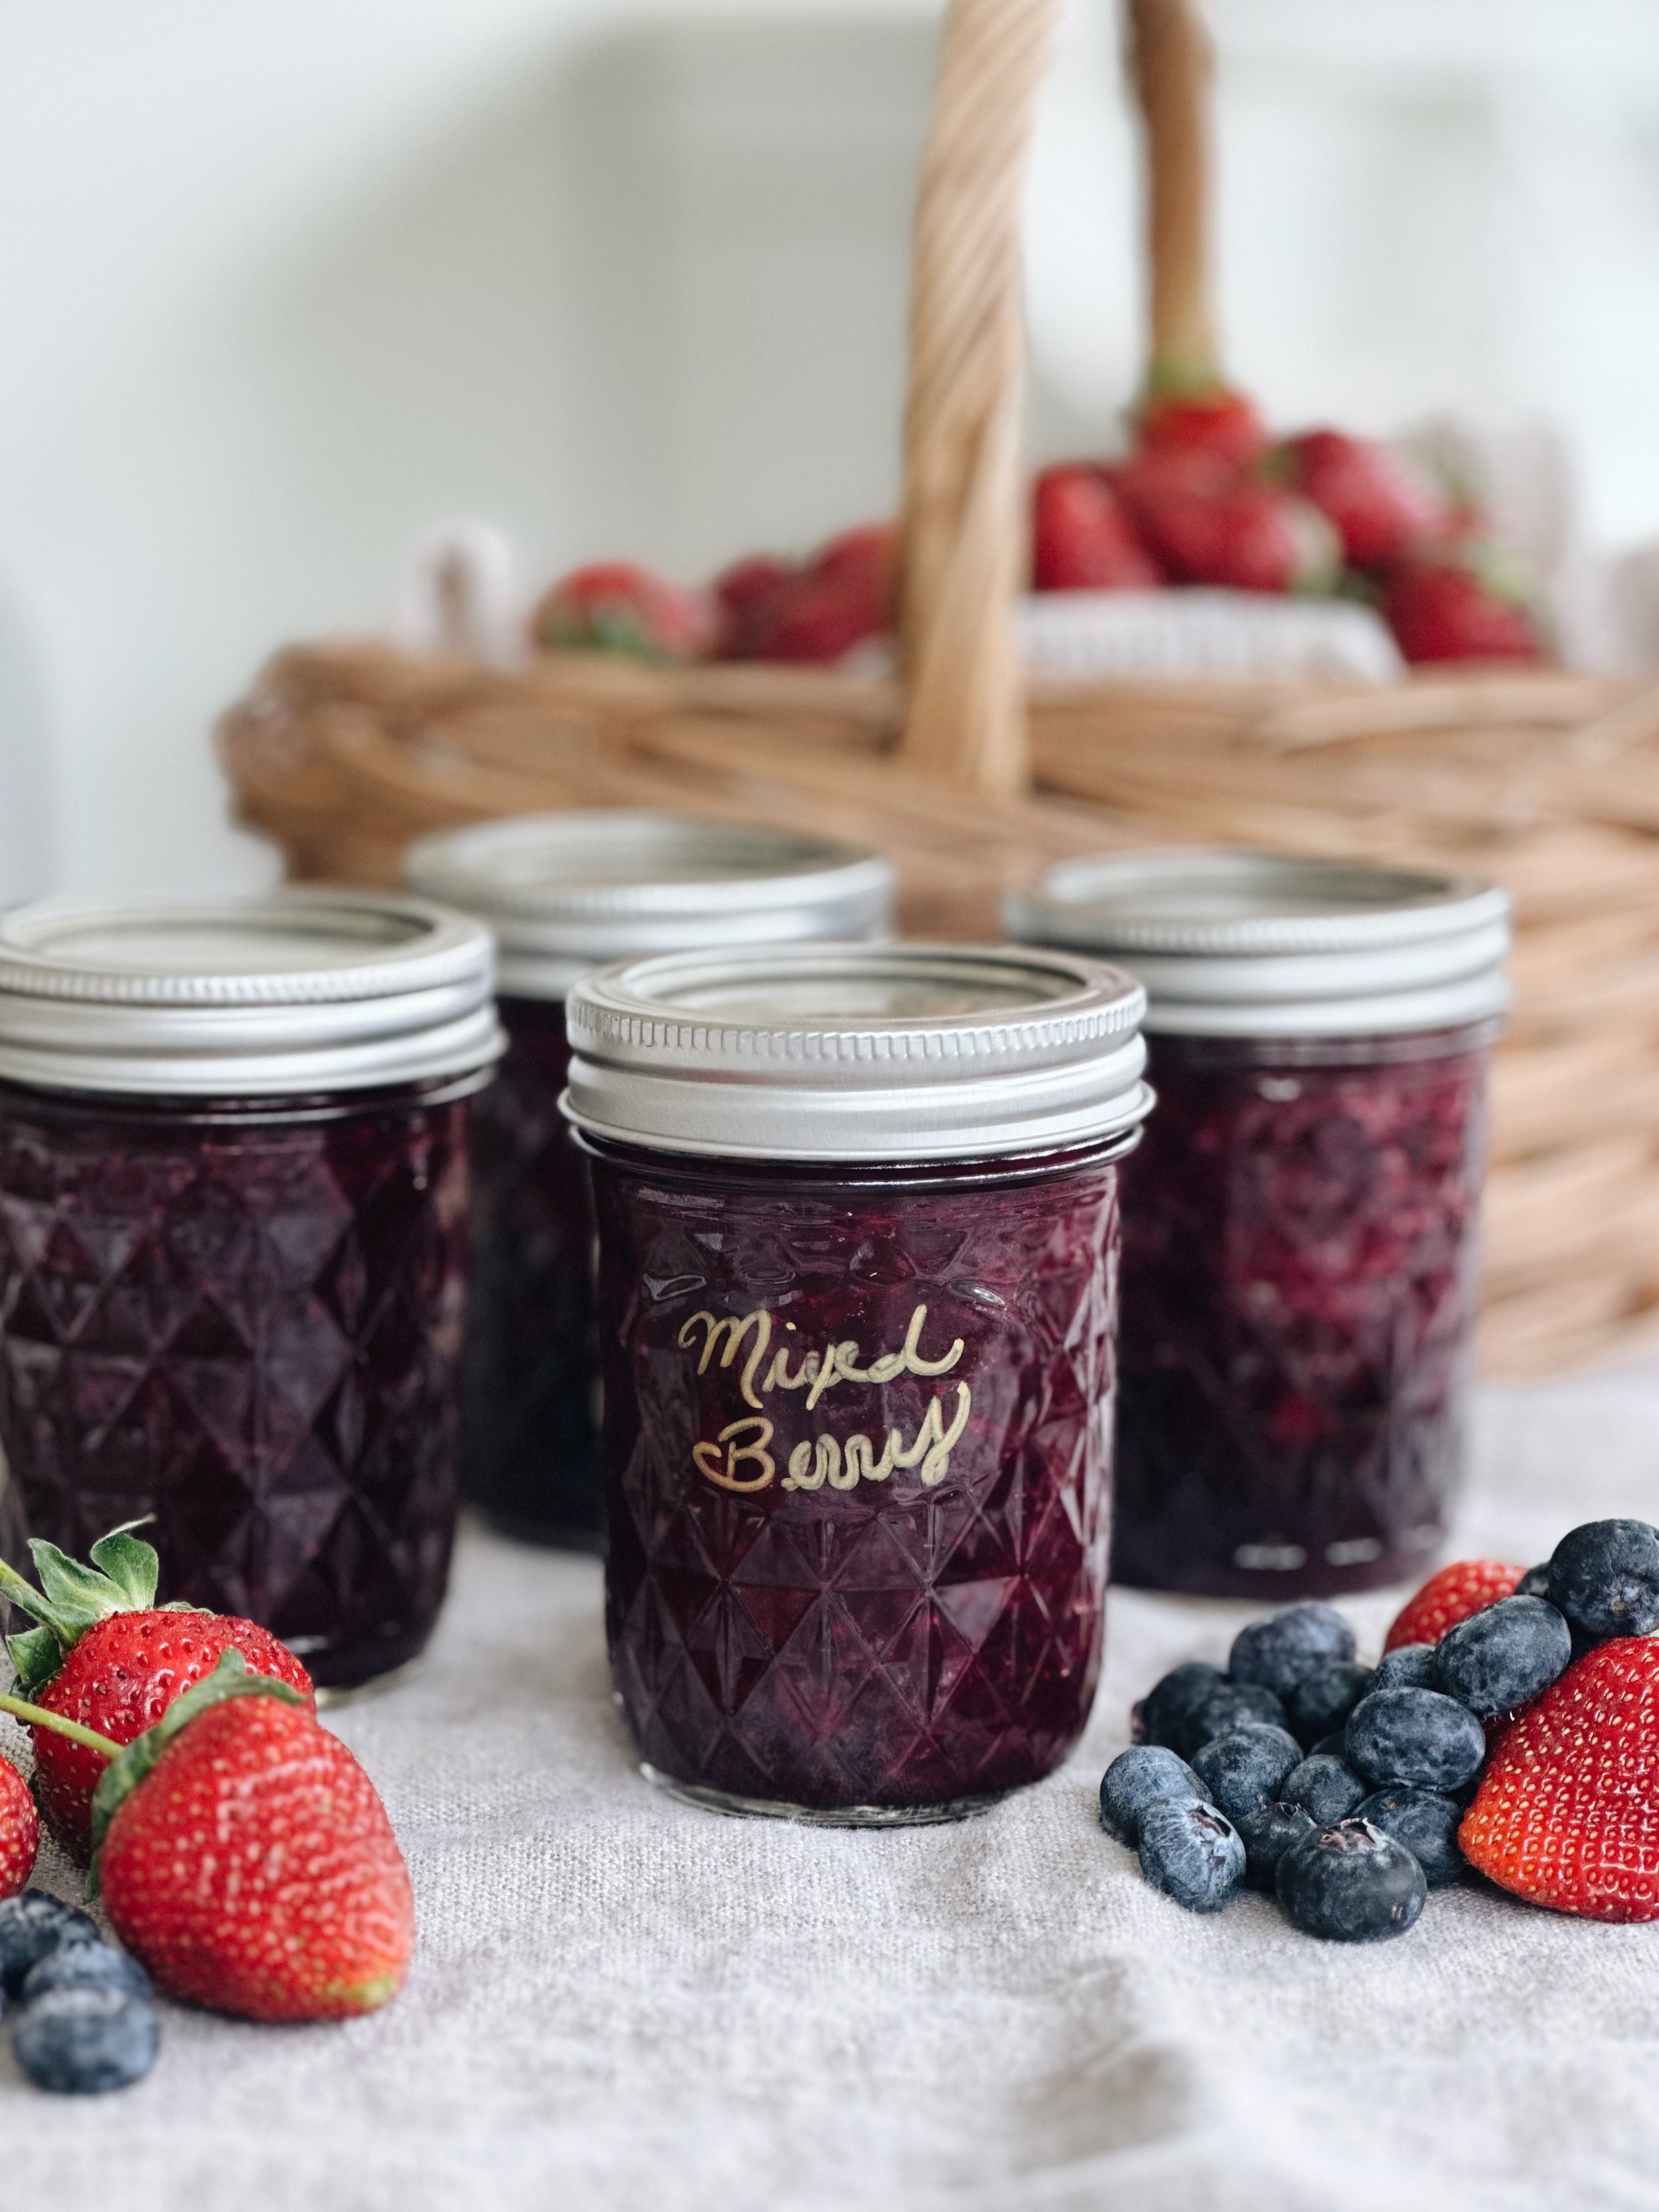
DELICIOUS mixed berry agave jam
This mixed berry agave jam has only 4 ingredients and is so easy to make. By using agave syrup, this jam recipe allows all the juicy fruit flavor to burst through with just a hint of sweetness.
Makes: About 4 (8 oz) half-pint jars . You can get the Quilted Ball® 8oz jar HERE
Prep time: 5 minutes
Processing time: 10 minutes
Ingredients
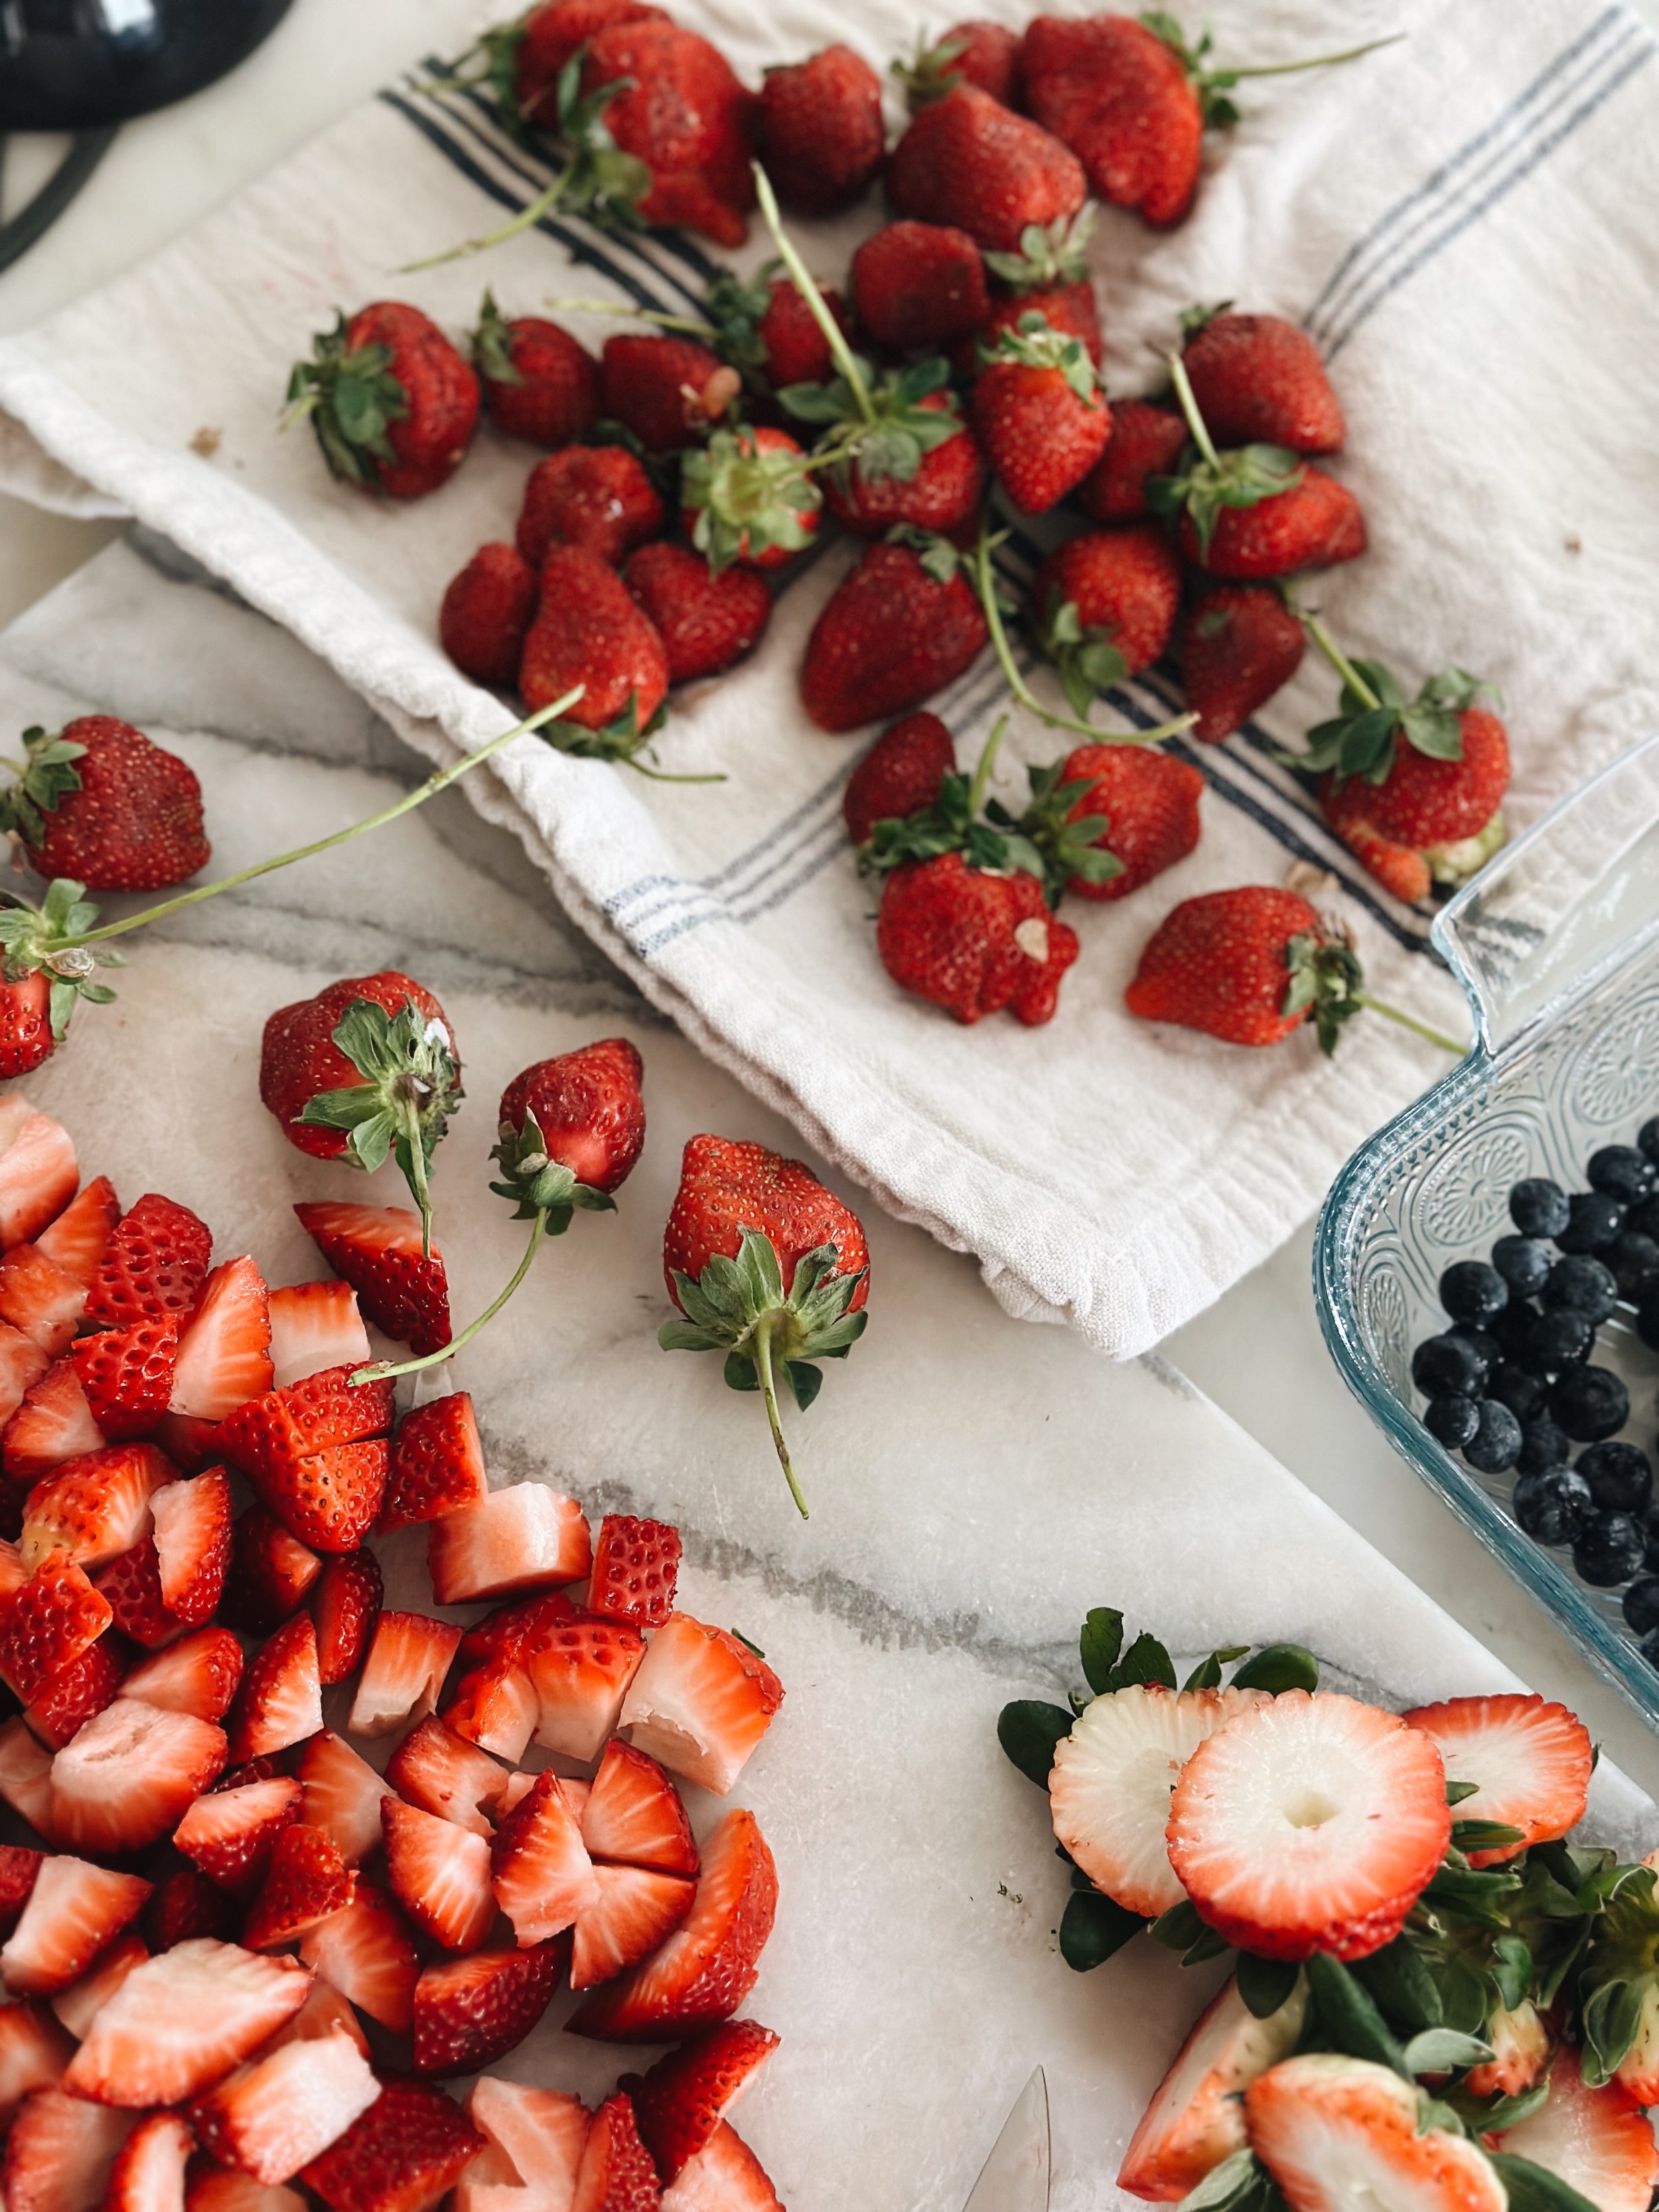
4 cups crushed mixed berries (fresh or thawed frozen)
1 ½ Tbsp bottled lemon juice
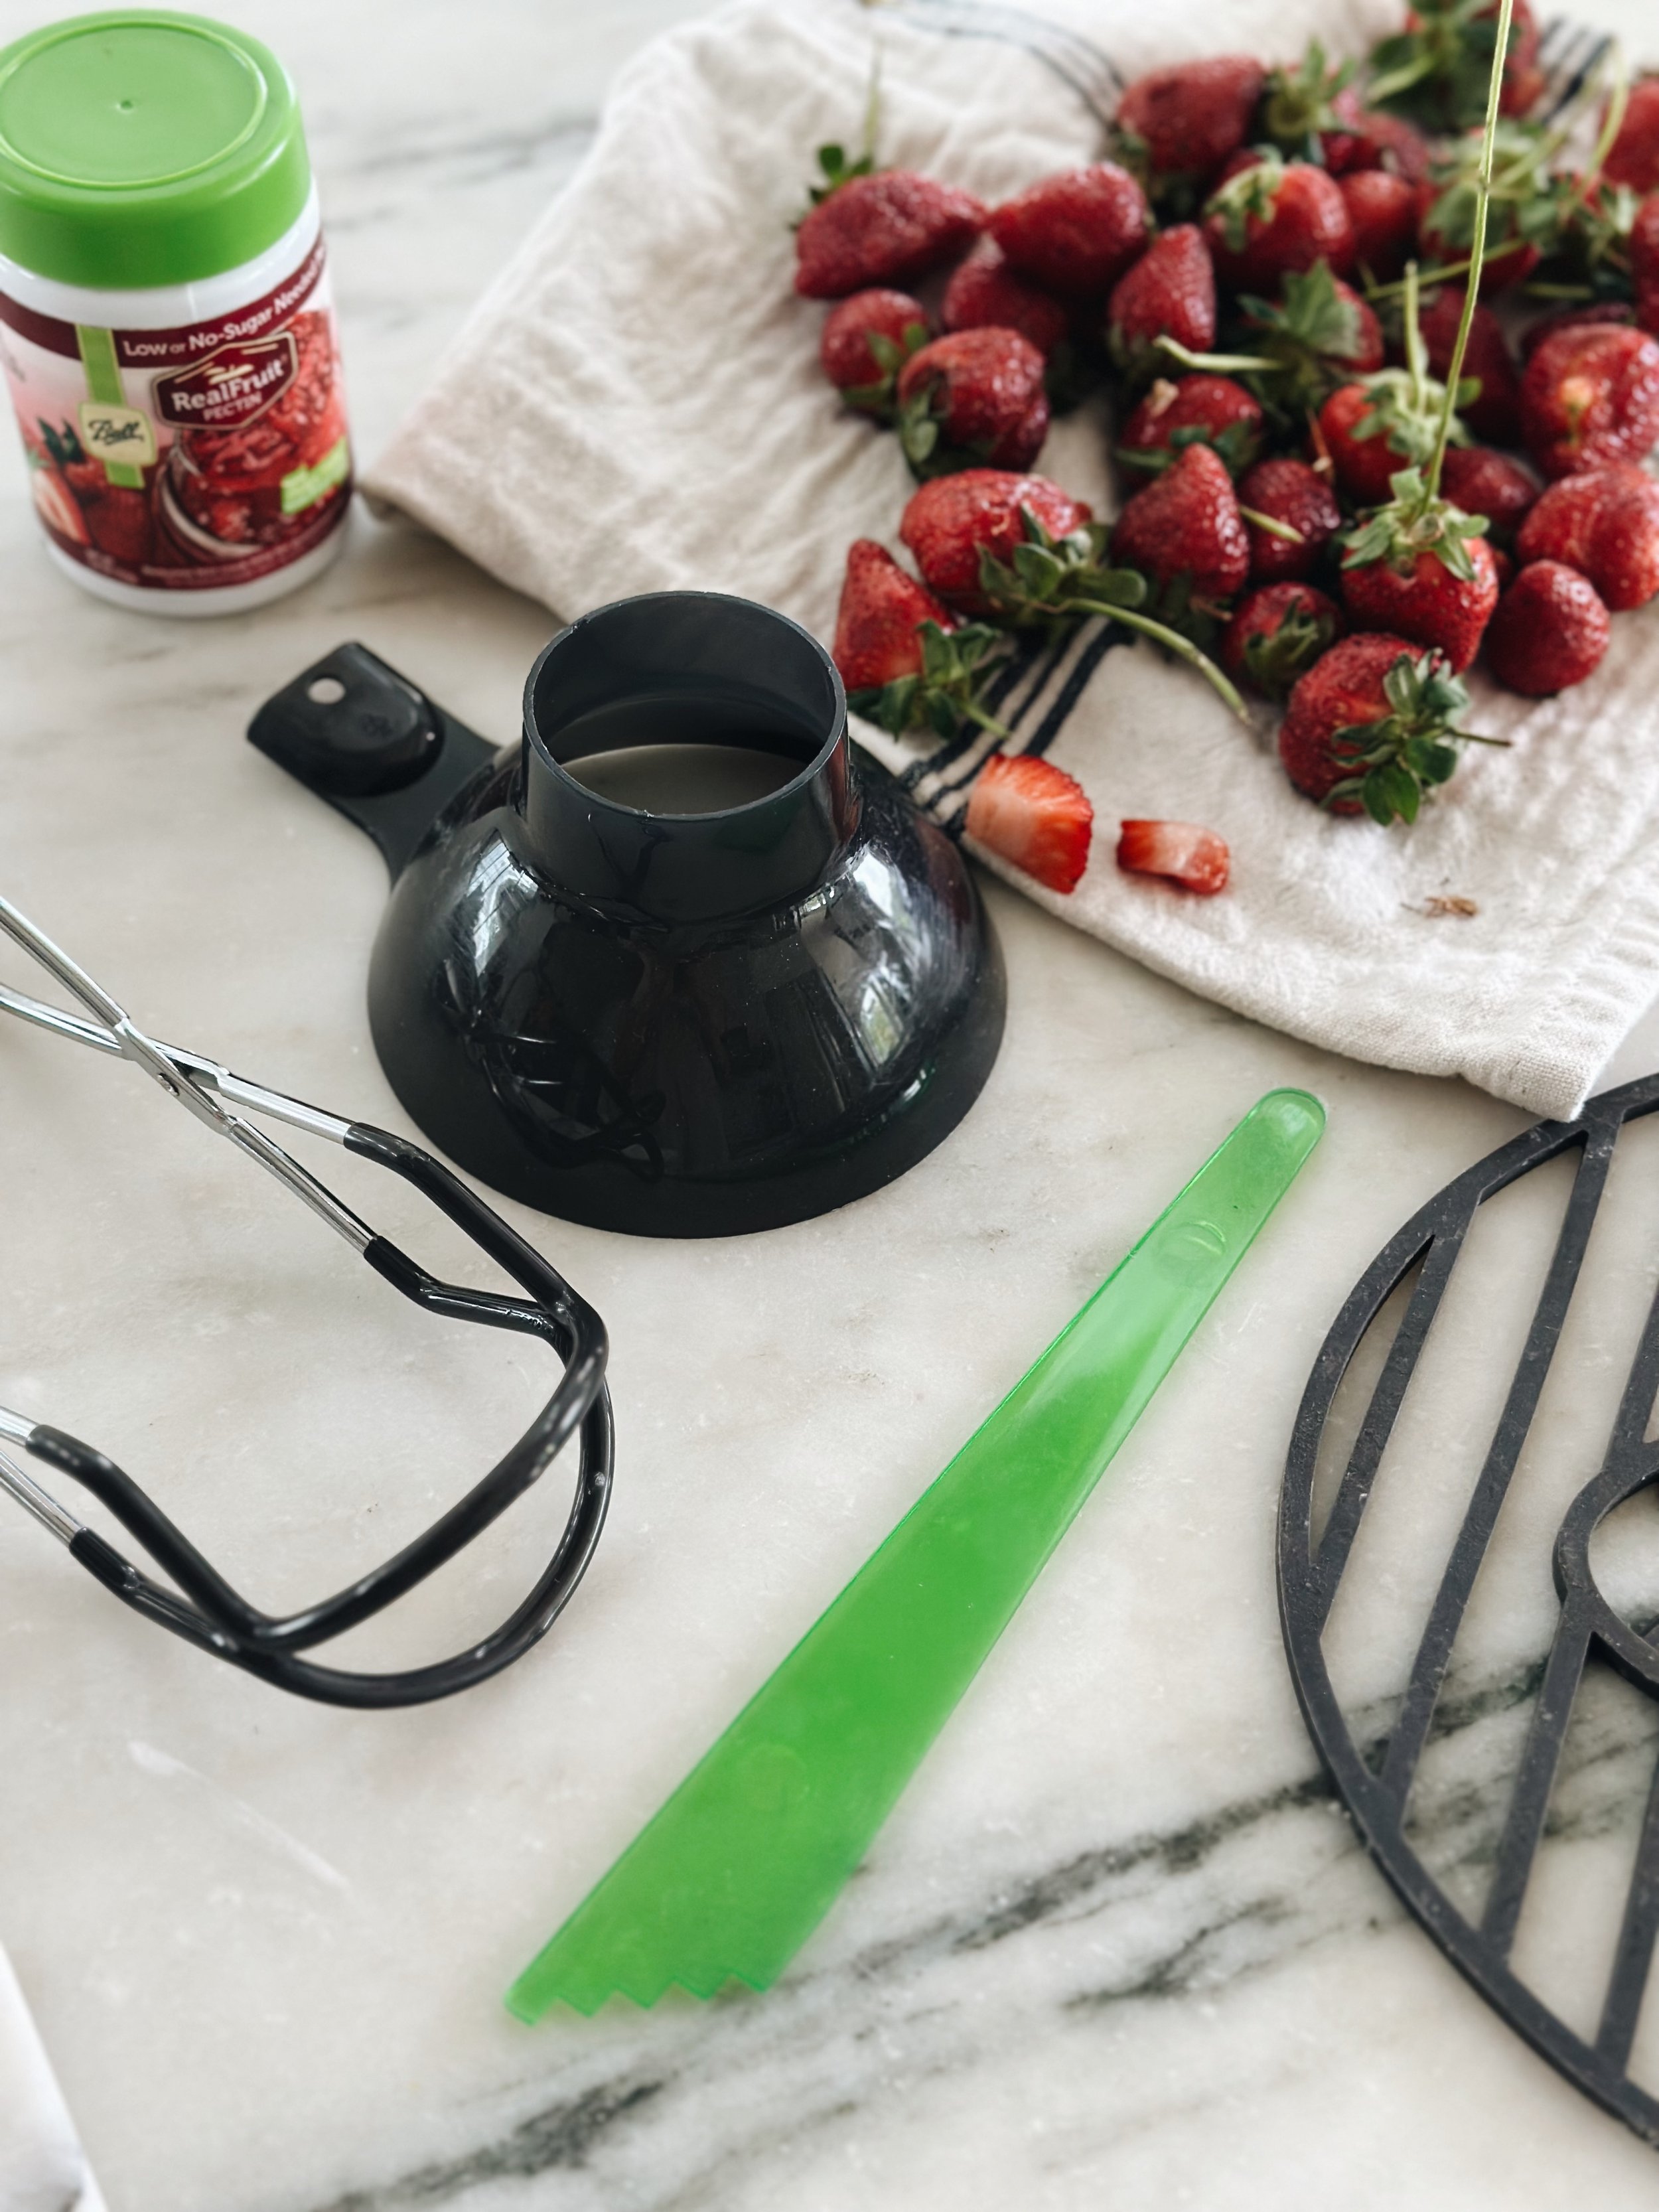
3 Tbsp Ball RealFruit™ Low or No-Sugar Needed Pectin
¾ cup agave syrup
Directions
Step 1
Fill your water bath canner with enough water to cover jars by 1-2 inches and bring to a simmer. Keep your jars in hot water (not boiling) until you are ready to add the food content. Wash lids and bands in warm soapy water and set aside.
Step 2
Place crushed berries and lemon juice in a saucepan. Sprinkle pectin evenly over berries and bring mixture to a full rolling boil that cannot be stirred down, over high heat, stirring constantly.
I don't have mixed berries; can I use other berries?
Don't assume you can substitute any fruit in a recipe unless the tested recipe says you can. Sometimes there are differences in the pH levels and other factors.
There's a berry jam recipe in the Ball® Blue Book that has 8 different berry options you can pick from.
I only have fresh lemons, not bottled lemon juice, will this work?
Unfortunately not. The correct acidity levels in food are crucial for the chosen canning method. This is why some recipes call for added acid, such as bottled lemon juice, vinegar, or citric acid.
The combination of acid and high temperatures will effectively kill microorganisms or bacteria when water bath canning. So when a recipe calls for added acidity, it is absolutely not optional. And you should also not change or reduce the acid type (or amount) in a tested recipe.
That's why you should always use bottled lemon juice instead of fresh lemon for a more consistent acidity.
Step 3
Whisk in agave syrup. Return mixture to a full rolling boil. Boil hard for 1 minute, stirring constantly. Remove from heat. Skim foam if necessary.
What if I don't have agave syrup? Or want to omit sugar entirely?
Sugar (in this case, the agave syrup) is added to canned fruits to help preserve color, keep a firm texture, and improve flavor.
You can safely reduce the amount of sugar, use a canning-safe sweetener, or omit it entirely. Still, you may end up with a less desirable product and consistency.
When a recipe calls for syrup, you can choose any syrup of your choice or even use honey.
Step 4
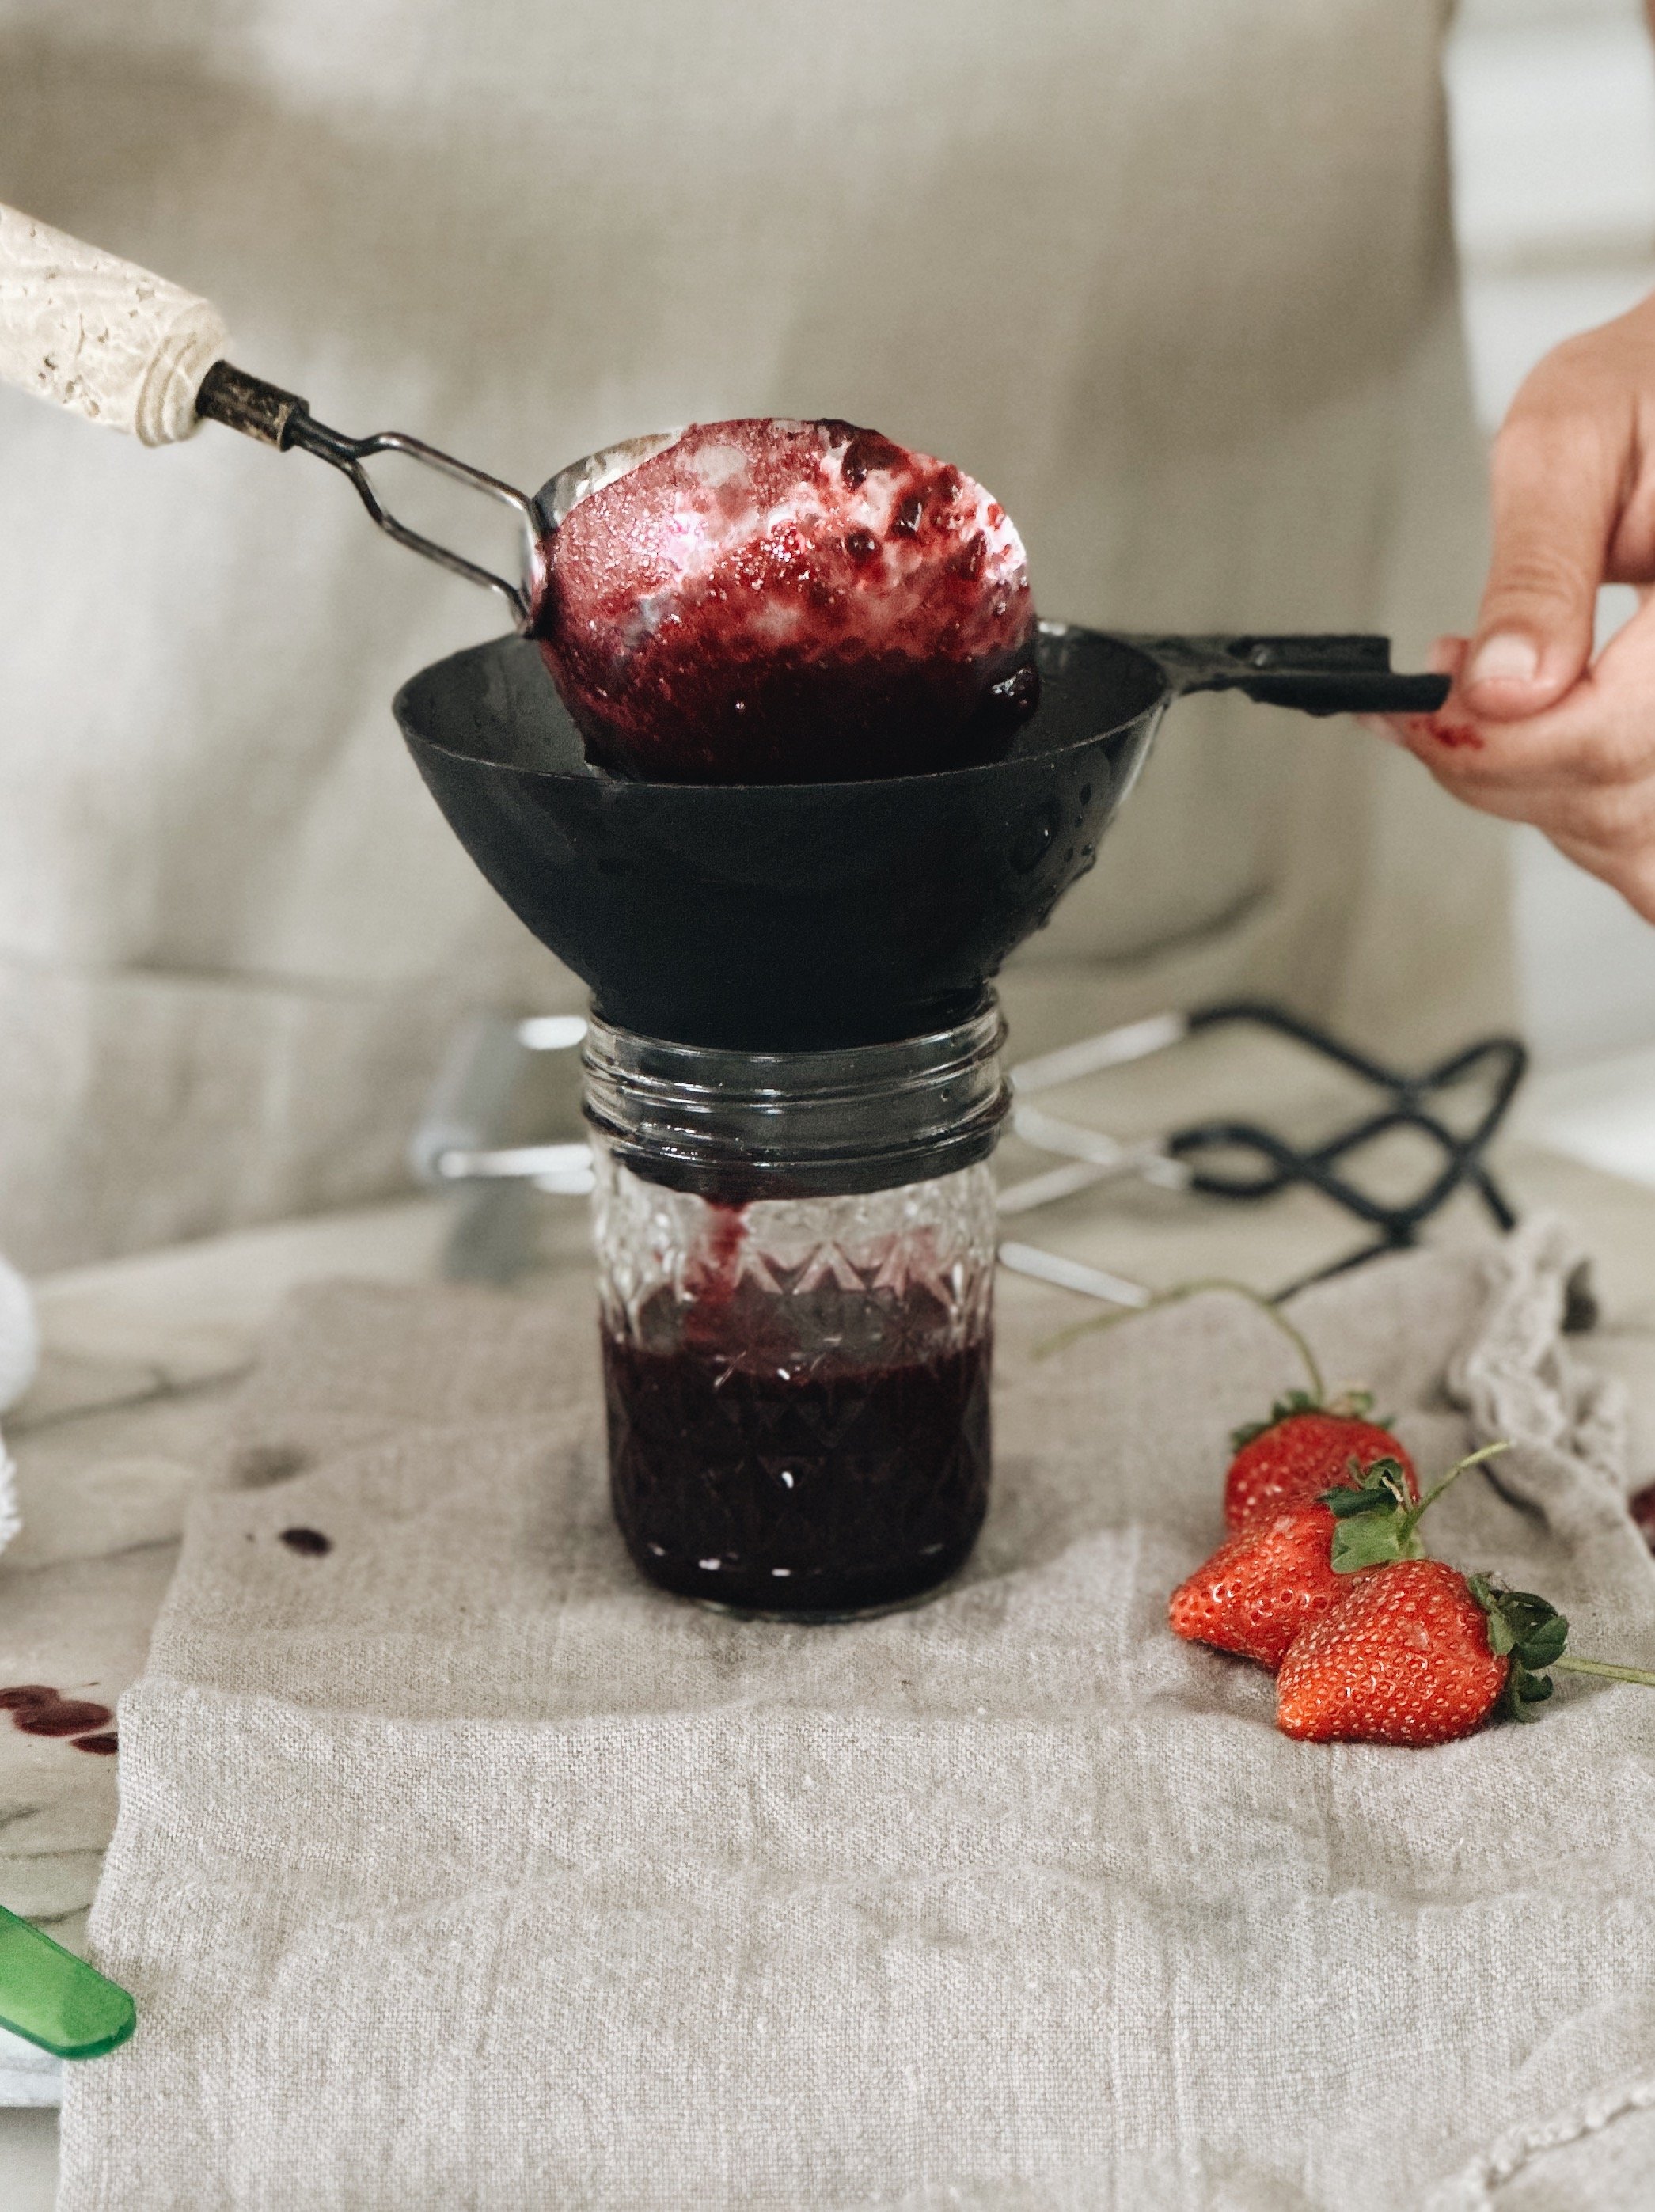
Ladle hot jam into a hot jar leaving a ¼ inch of headspace. Fill one jar at a time with the food content. Do not assembly line fill.
What if my jars break?
Ball® jars can withstand very high temperatures and will not break easily if used and processed correctly. But you should still always warm up the jars before adding the food and processing. The golden rule: Don't put cold in hot or hot in cold.
When removing the jars after processing, ALWAYS place them on a towel or wood cutting board and never directly onto a cold surface or countertop. Otherwise, you may risk the jar cracking or breaking due to temperature shock.
Step 5
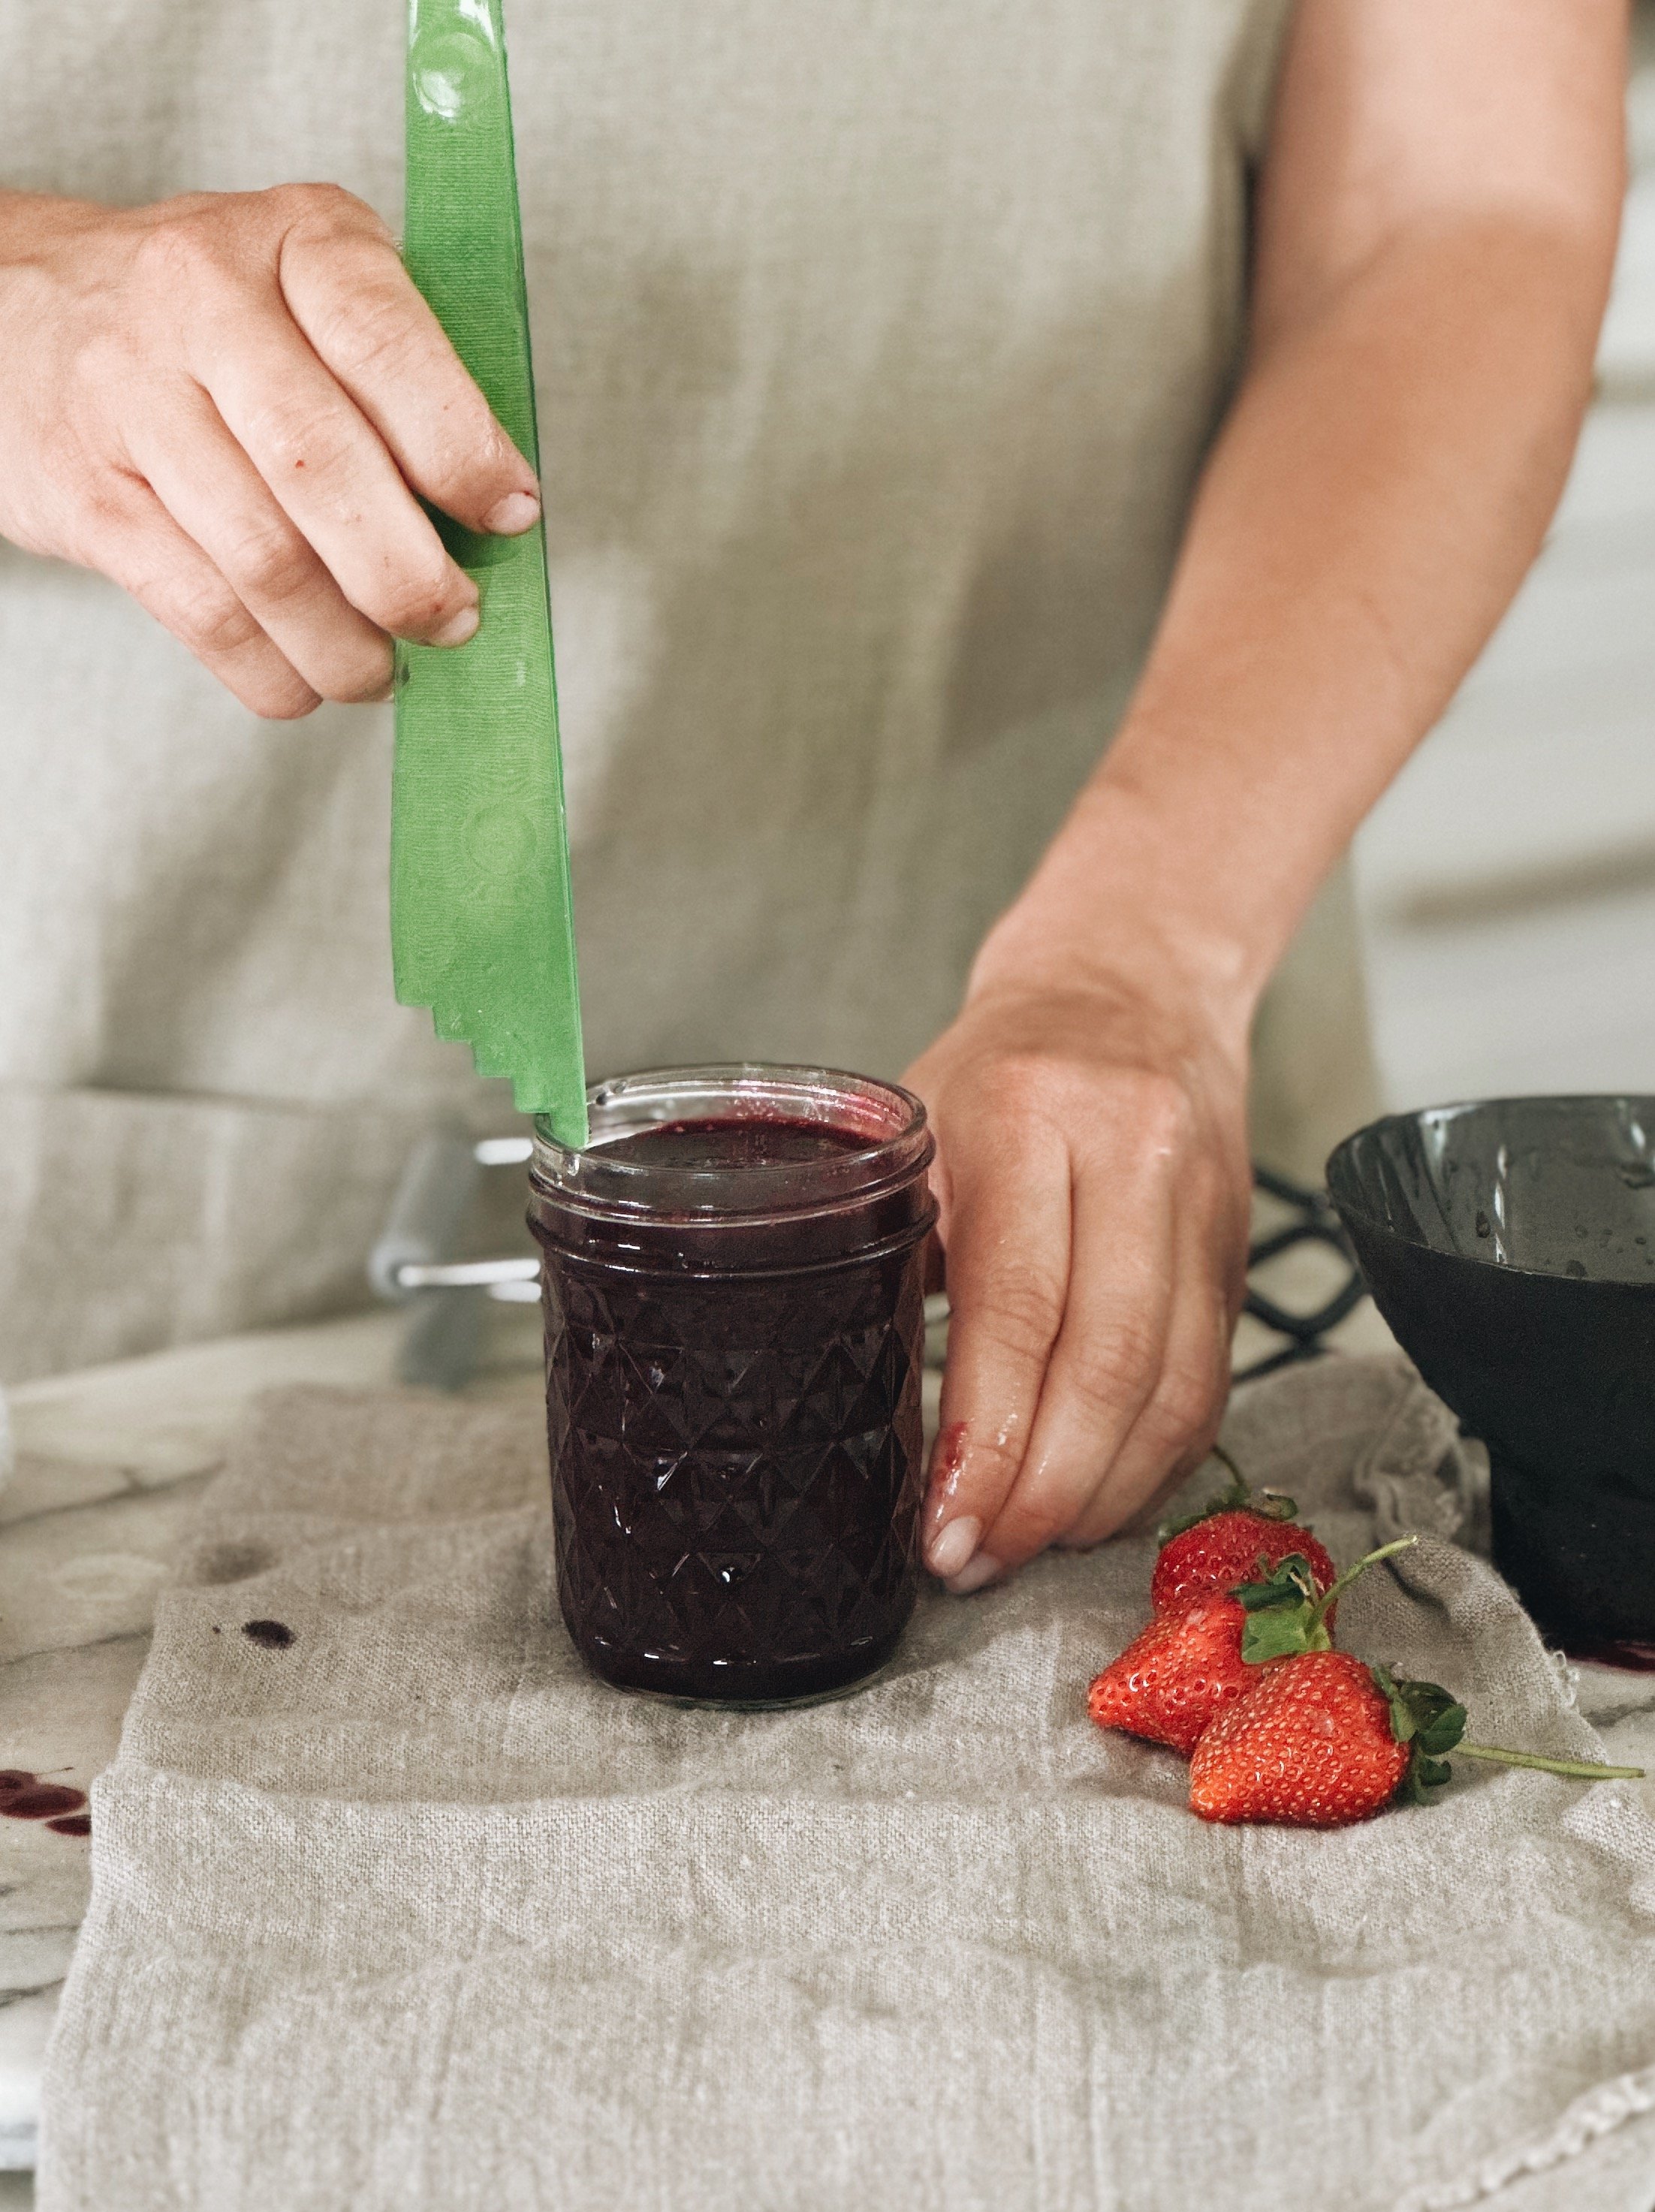
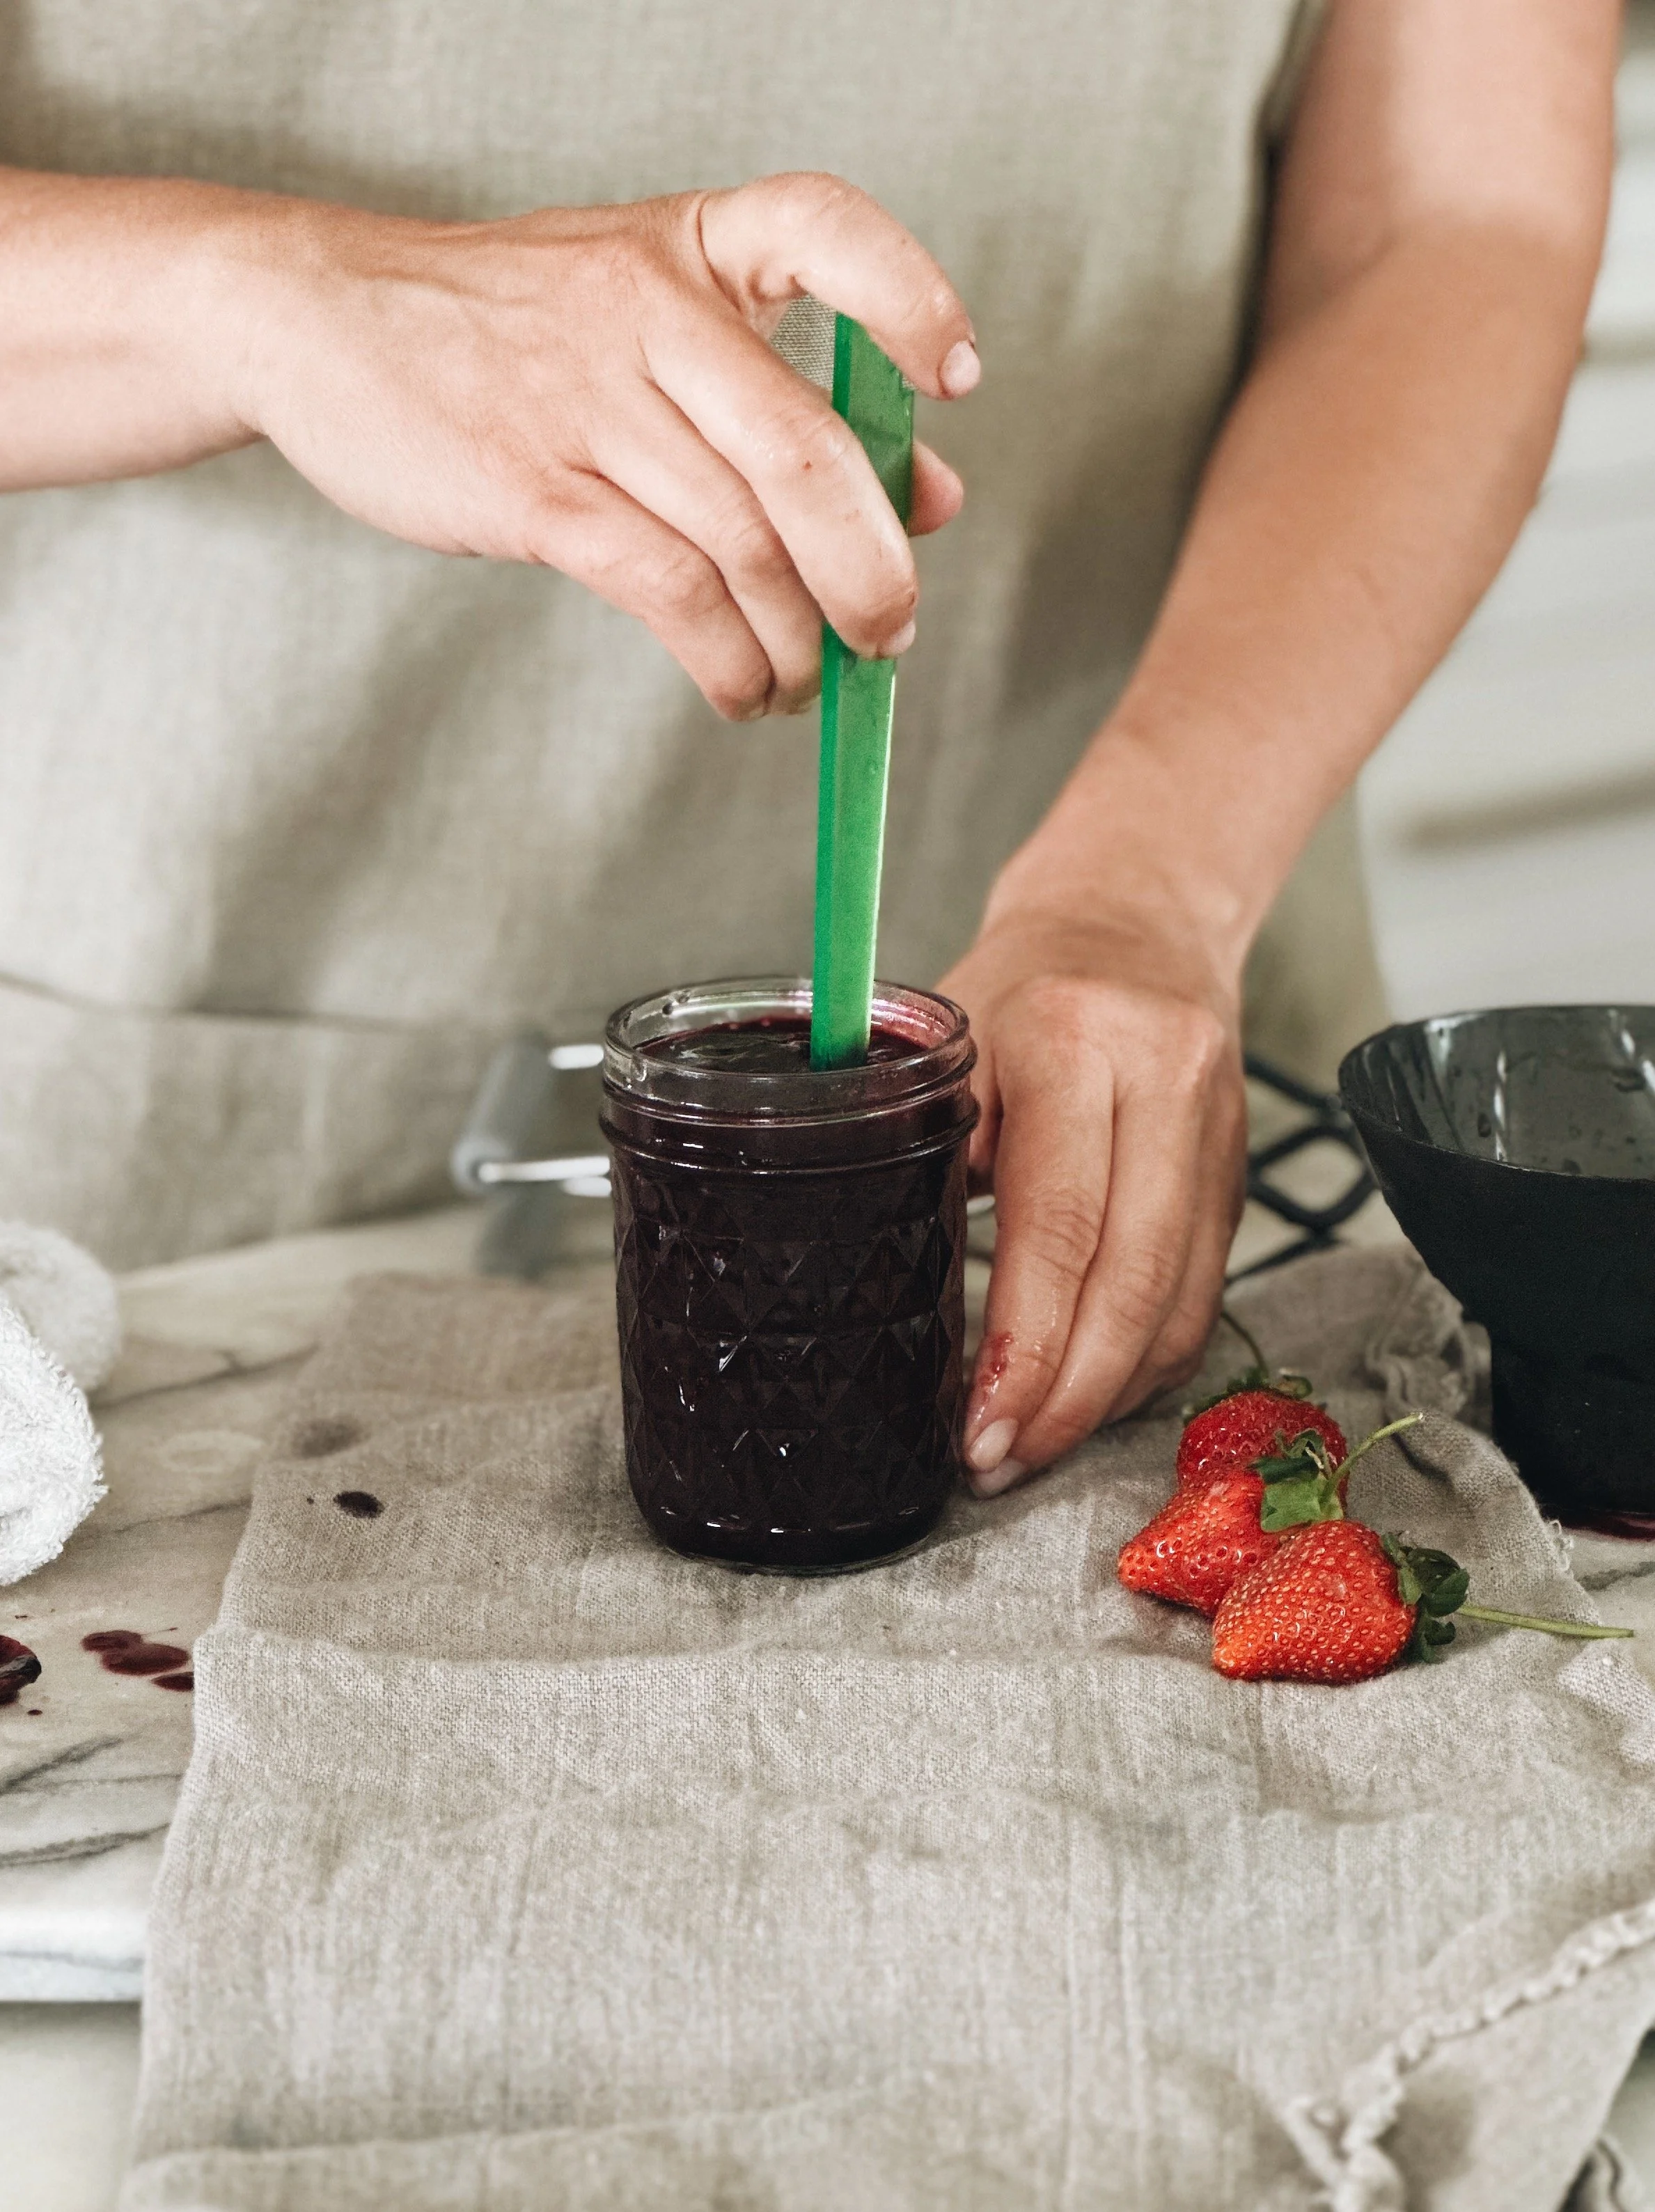
Remove any air bubbles with the bubble remover or a rubber spatula by sliding the tool down the side of the jar, then pulling inwards. Rotate and repeat around the jar as needed until all bubbles are removed. Repeat this two to three times.
Step 6
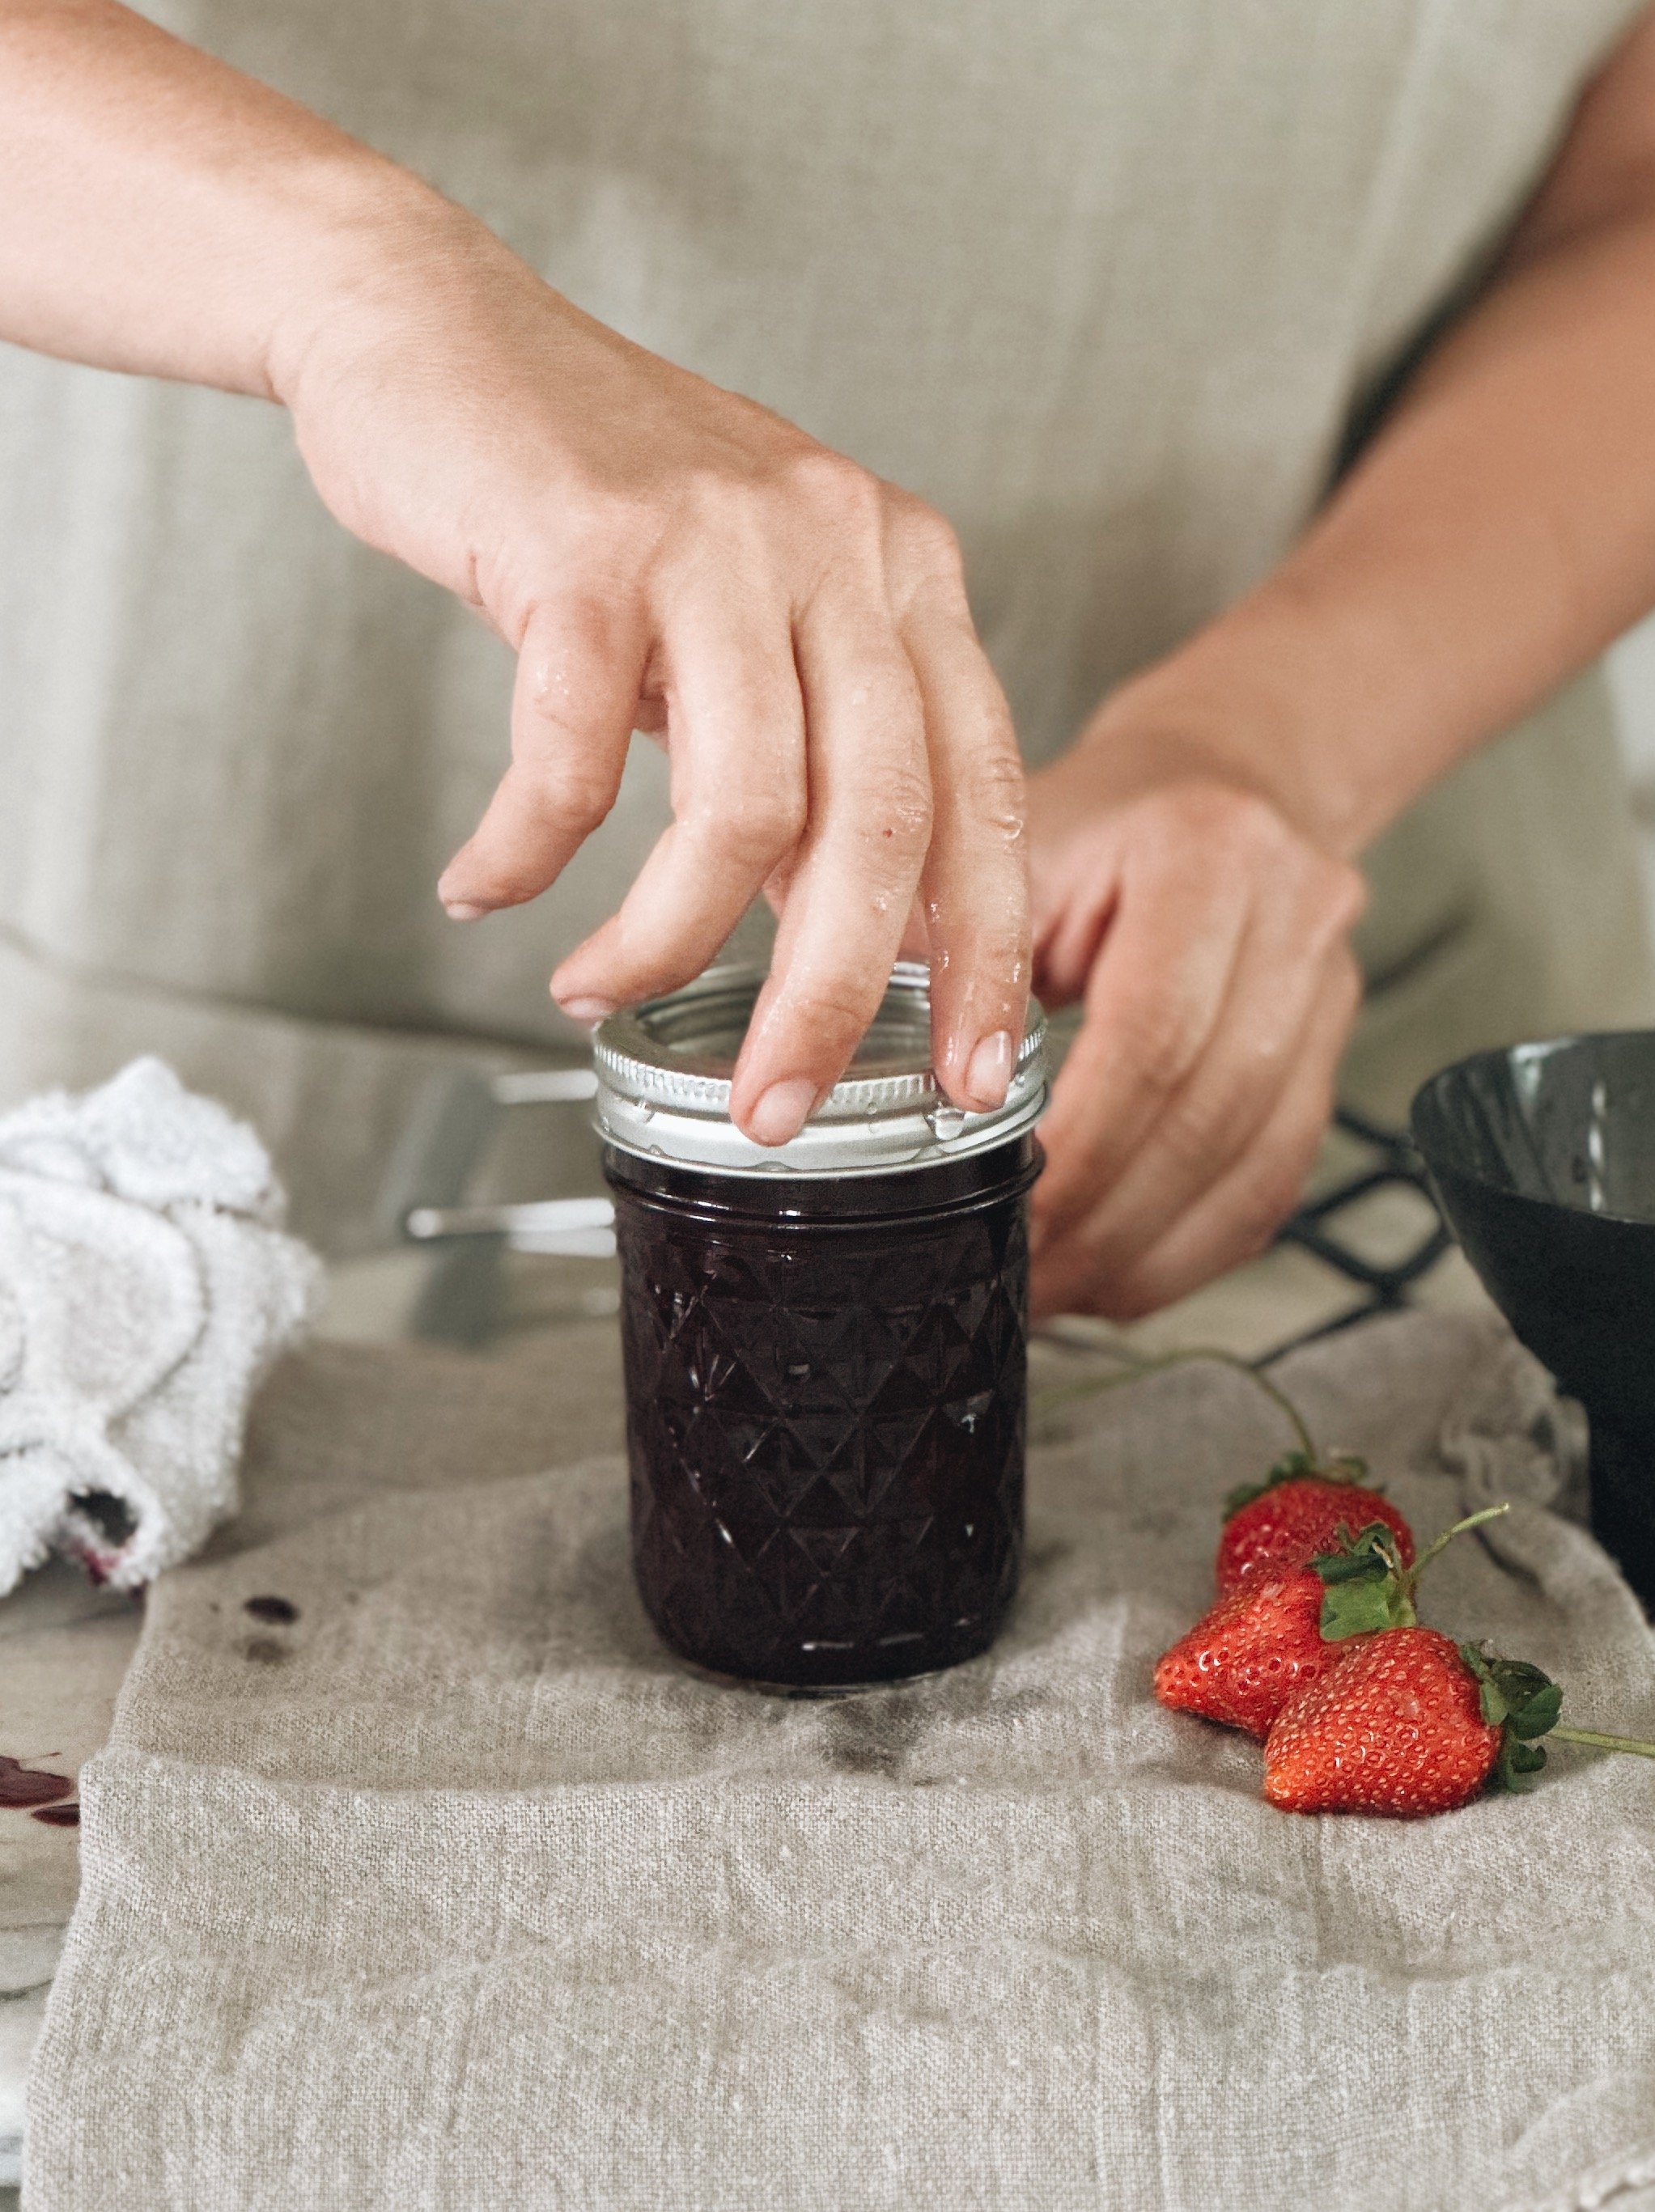
Wipe the rim and threads using a damp cloth to remove any food residue.
Place the lid on and screw the band on until it is fingertip-tight.
Using your jar lifter, place the jar upright into the water and onto the rack. Your jars should be covered with 1-2 inches of water; if not, add more water. Repeat steps 4 - 6 for each jar one at a time until all your filled jars have been placed into the canner.
I don't have a canning rack. Can I place the jars directly on the bottom?
No, please don’t! You should always put something between the jars and the bottom, like a canning rack, trivet, or DIY rack you made from extra bands. The jars should not touch the bottom of the pot. This is to prevent breakage and to ensure even heat distribution.
Step 7
Turn the heat up, and wait until you hear or see the water vigorously boiling (rolling boil). The processing time of a recipe only starts when the water has reached boiling point. Start your timer and process the jars for 10 minutes, adjusting for altitude.
I live in the mountains; how do I adjust for altitude?
The lower the atmospheric pressure, the lower the boiling point of water. Which, therefore, is less effective at destroying microorganisms with every increase in altitude. This means you must adjust your processing times depending on your altitude. Follow this guideline:

Step 8
When the processing time is completed, turn off your burner. Remove the pot's lid away from you (be careful of the steam!), and wait 5 minutes before taking your jars out. This helps for a better vacuum seal.
Step 9
Carefully remove the jars, one at a time, with the jar lifter. Keep them upright, and place your jars on a towel or wood cutting board. Never place them directly onto a cold surface or countertop to prevent cracking due to thermal shock.
Leave the jars untouched for 12-24 hours. Do not tamper with the lids or bands or wipe away water ;-)
After 12-24 hours, check if the lids have been sealed. Press the center - A properly sealed jar lid will not spring up when you press down in the center. Remove the band and use a finger to press down on the middle of the lid. If the lid springs up when you lift your finger, the jar must be reprocessed before you can store it safely.
My jar/s did not seal; what now?
When your jars don't seal after processing, you have a couple of choices depending on what you are canning:
Enjoy the food that very same day. Make a delicious lunch or dinner!
Store it in the refrigerator and use it within a couple of days.
Place the jar in the freezer (if it is a freezer-safe jar) and enjoy it at a later stage.
Reprocess the unsealed jar – here's how:
Check the jar rim for any chips, cracks, or dents which may have caused the inability to seal. Replace the jar if necessary and use a new lid.
Adjust the headspace again.
Follow the canning recipe again and reprocess the jar in the water bath canner.
Remember, it is crucial to follow a tested and approved recipe. Not following an approved recipe, leaving incorrect headspace, insufficient processing times, and tiling the jars are reasons lid do not seal and can lead to unsafe and improperly preserved food.


print this recipe

mixed berry agave jam
Ingredients:
4 cups crushed mixed berries (fresh or thawed frozen)
1 ½ Tbsp bottled lemon juice
3 Tbsp Ball RealFruit™ Low or No-Sugar Needed Pectin
¾ cup agave syrup
Directions:
Step 1
Fill your water bath canner with enough water to cover jars by 1-2 inches and bring to a simmer. Keep your jars in hot water (not boiling) until you are ready to add the food content. Wash lids and bands in warm soapy water and set aside.
Step 2
Place crushed berries and lemon juice in a saucepan. Sprinkle pectin evenly over berries and bring mixture to a full rolling boil that cannot be stirred down, over high heat, stirring constantly.
Step 3
Whisk in agave syrup. Return mixture to a full rolling boil. Boil hard for 1 minute, stirring constantly. Remove from heat. Skim foam if necessary.
Step 4
Ladle hot jam into a hot jar leaving a ¼ inch of headspace. Fill one jar at a time with the food content. Do not assembly line fill.
Step 5
Remove any air bubbles with the bubble remover or a rubber spatula by sliding the tool down the side of the jar, then pulling inwards. Rotate and repeat around the jar as needed until all bubbles are removed. Repeat this two to three times.
Step 6
Wipe the rim and threads using a damp cloth to remove any food residue. Place the lid on and screw the band on until it is fingertip-tight. Using your jar lifter, place the jar upright into the water and onto the rack. Your jars should be covered with 1-2 inches of water; if not, add more water. Repeat steps 4 - 6 for each jar one at a time until all your filled jars have been placed into the canner.
Step 7
Turn the heat up, and wait until you hear or see the water vigorously boiling (rolling boil). The processing time of a recipe only starts when the water has reached boiling point. Start your timer and process the jars for 10 minutes, adjusting for altitude.
Step 8
When the processing time is completed, turn off your burner. Remove the pot's lid away from you (be careful of the steam!), and wait 5 minutes before taking your jars out. This helps for a better vacuum seal.
Step 9
Carefully remove the jars, one at a time, with the jar lifter. Keep them upright, and place your jars on a towel or wood cutting board. Leave the jars untouched for 12-24 hours.
After 12-24 hours, check if the lids have been sealed. Press the center - A properly sealed jar lid will not spring up when you press down in the center. Remove the band and use a finger to press down on the middle of the lid. If the lid springs up when you lift your finger, the jar must be reprocessed before you can store it safely.
This mixed berry agave jam is the perfect balance between tart and sweet! This will be a new favorite with whomever you share it with!
And as you can see, with these few steps, anyone really can make homemade jam!
But I know canning can seem daunting, and you may be just too scared that things go sideways, I’ve been there! Friend, I assure you, when you simply follow an approved recipe and all the correct steps, canning is easy and so much fun.
READ MORE: Your canning fears, problems, and concerns addressed with easy solutions
Love, Annette xx
Still unsure about this whole canning thing and process?
Do you still have canning fears and questions?
Want to learn all there is on how to can food and become a canning expert?
Then you might want to get my CANNING COURSE in partnership with Ball® home canning!

